Thursday, April 5, 2018

LinkedIn Pulse: A Complete Guide (+ Examples)

email marketing strategies 2016

You blog because you want Internet users to discover your content and engage with it. But sometimes, your reach just isn’t large enough.

That’s why it’s good to diversify your content.

Creating more content and putting it in more places gives you as many views, readers, and customers as possible.

If you want to boost brand awareness and engagement, you need to be active on as many platforms as you can to spread your brand across the web.

That’s why most businesses use sites like Facebook, Twitter, Instagram, and LinkedIn in addition to their regular websites.

But some businesses are missing a huge opportunity to publish content because they don’t realize that they can post full articles to LinkedIn via LinkedIn Pulse.

There are tons of reasons why blogging with LinkedIn Pulse is a win for businesses. Here’s a complete guide to using and publishing on the platform along with actionable examples of how to do it.

What is LinkedIn Pulse?

If you want to build a good reputation online, increase your credibility, and reach a larger audience, publishing content on social media can help you do that.

LinkedIn Pulse takes social media content a step further with an online news aggregation feed. Members can share self-publish content right to their audiences.

The platform generates blog posts, insights, and news from influential industry professionals and businesses looking to extend their reach and share insider knowledge.

LinkedIn tailors content to each individual based on their interests. That way, users only see the content that they want to see.
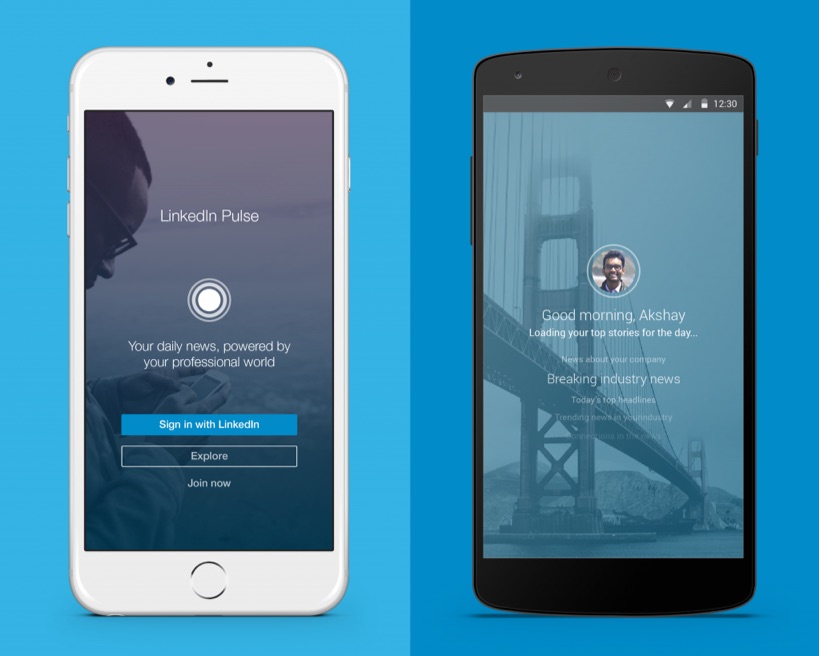
linkedin pulse app

Content for the Pulse platform originally came from huge, well-known influencers. Now, all LinkedIn members can create and publish their own content for their followers.

If you’re a business or a thought leader, this is an easy and efficient way to build rapport. After all, most businesses are already using LinkedIn in some capacity.

According to DemandWave, 92% of B2B marketers include LinkedIn in their digital marketing mix.
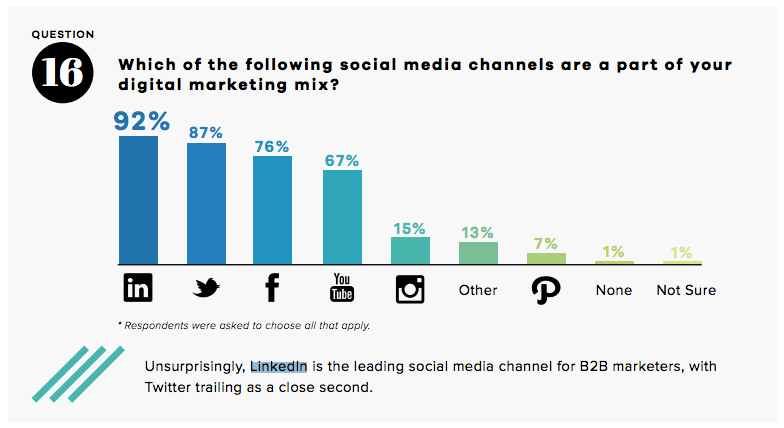
linkedin pulse in digital marketing

The platform also allows you to track the demographics of your readers to gain audience insights.

You can view the industries, job titles, and locations of your readers as well as the traffic sources that they are using to view your content.
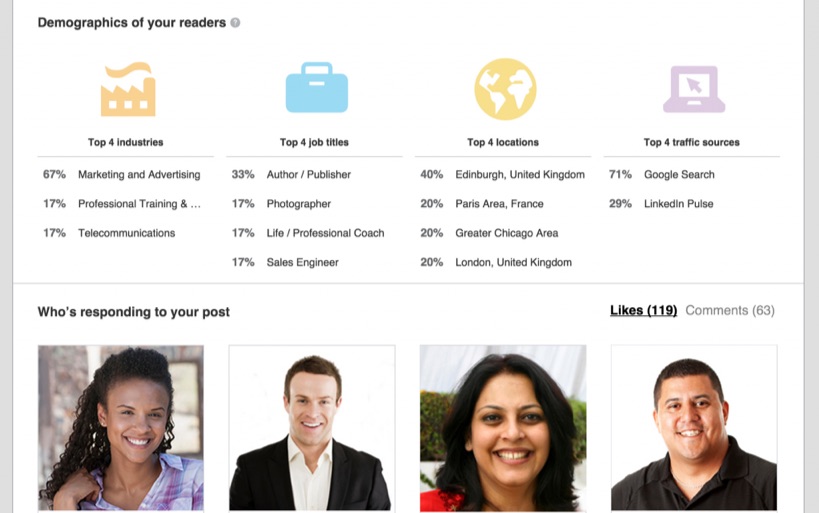
linkedin pulse demographics of your readers

If those features haven’t already convinced you that LinkedIn Pulse can help you boost brand awareness, then read on.

Reasons why you should use LinkedIn Pulse

You might be wondering, “What makes LinkedIn pulse better than other networks?” Or you might be thinking, “Why should I worry about posting to Pulse if I already have a blog?”

One of the largest advantages of Pulse is that the sole purpose of it is to help nurture and grow professional relationships.

Because of this, Pulse is great for helping you connect with your audience on a deeper level.

Connect with your audience

On LinkedIn, your audience isn’t just anyone. You know that your content is going to reach professionals at every level of many different kinds of businesses.

And you can leverage this content to boost your visibility across the web so that you can steer your audience toward any future content that you may list on your profile.

Just like any content that you post on the web, Pulse content can help you increase your search engine visibility.

And LinkedIn will notify your connections every single time you publish a post. That way, your posts won’t get lost among the crowd.
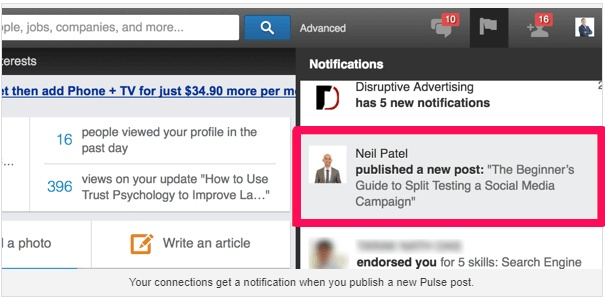
neil patel published a post on linkedin pulse

Engage customers through useful content

LinkedIn Pulse is also great because it helps you engage customers through content that is genuinely useful.

This is possible because of the unique nature of LinkedIn. It’s a place where social and professional networking combine.

Professionals on the site are motivated to grow, learn, and consume. They want to grow and interact with a network, follow people and brands they’re interested in, and make connections.

How do users do this? They have to engage with others and deliver content that focuses on their goals.

If you create high-quality content, you can help your audience engage.

According to LinkedIn, 62 percent of members say that they engage with content because it is informative or educational. 61% say that they engage with content that is relevant to them.

If you post content that is relevant, inspiring, or educational, you’re bound to build an engaged customer base in no time.

But how does Pulse work, exactly?

How does LinkedIn pulse work?

Most of the content on the LinkedIn homepage feed comes from Pulse.

Pulse users receive weekly email digests containing new posts, and users publish more than 130,000 original articles every week.

There are mobile apps for both iOS and Android. To get started, users don’t need to follow topics or publishers.

They can just log in to LinkedIn to get personalized news based on their industry and connections.

The cards on the interface allow users to skim through tons of content and publishers quickly.

If users want to read a story at a later time, the app allows them to save it. Users can easily dismiss stories that they don’t like, and they can follow authors with the click of a button.

Each of these actions refines future recommendations.
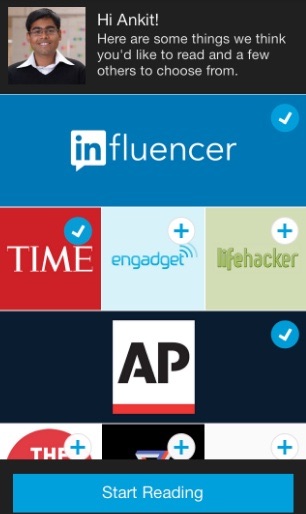
start reading on linkedin pulse

LinkedIn sends notifications from the app based on what’s trending in a user’s field, the authors that they follow, and their previous actions on the platform.
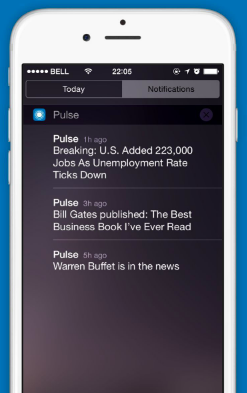
pulse ios notifications

If a connection or industry influencer appears in the news, LinkedIn will notify users about the piece of content that mentioned them.

With Pulse, you can target readers with relevant stories based on their connections and professional footprints.

All you have to do is publish on the platform to get started making waves with your audience.

How to publish on LinkedIn Pulse to connect with your audience

Before you publish any kind of content, you need a game plan. What’s the big picture?

Do you want to share insider advice, strengthen your brand, interest recruiters, earn your spot as a thought leader, expand your network, or all of the above?

Step 1: Choose a message and start writing.

Once you know why you’re writing, you can choose a message and focus on who you’ll be writing to. Pick a clear, straightforward message.

Do you want to write tips for freelancers? Or maybe you want to write about the best practices for hiring new employees in order to appeal to those in management.

If you’re having trouble choosing a message, think back to what you’ve benefited from in your career.

What advice would you give someone entering your field? Where is the industry headed? Is there anything big going on in the news that is going to impact your line of work?

Once you have a topic or keyword, turn to Answer the Public to dwindle down potential angles.
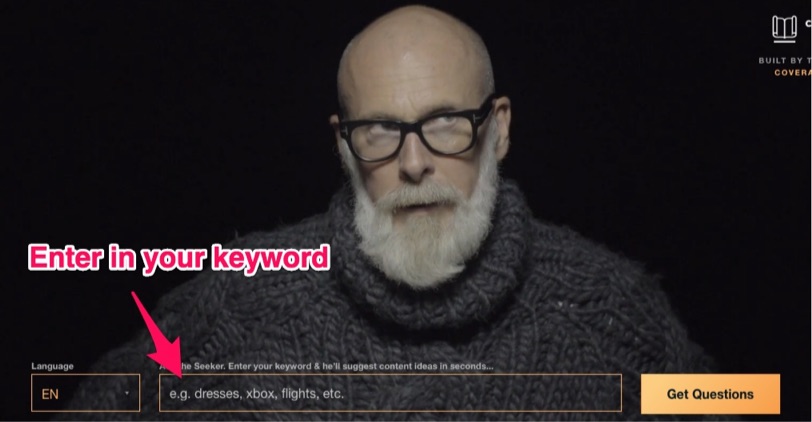
answer the public enter keyword

For example, say you want to write about social media marketing.

Just enter in the keyword, and the tool will recommend hundreds of ideas in the “why,” “are,” “how,” “where,” “which,” “who,” “what,” and “when” categories.
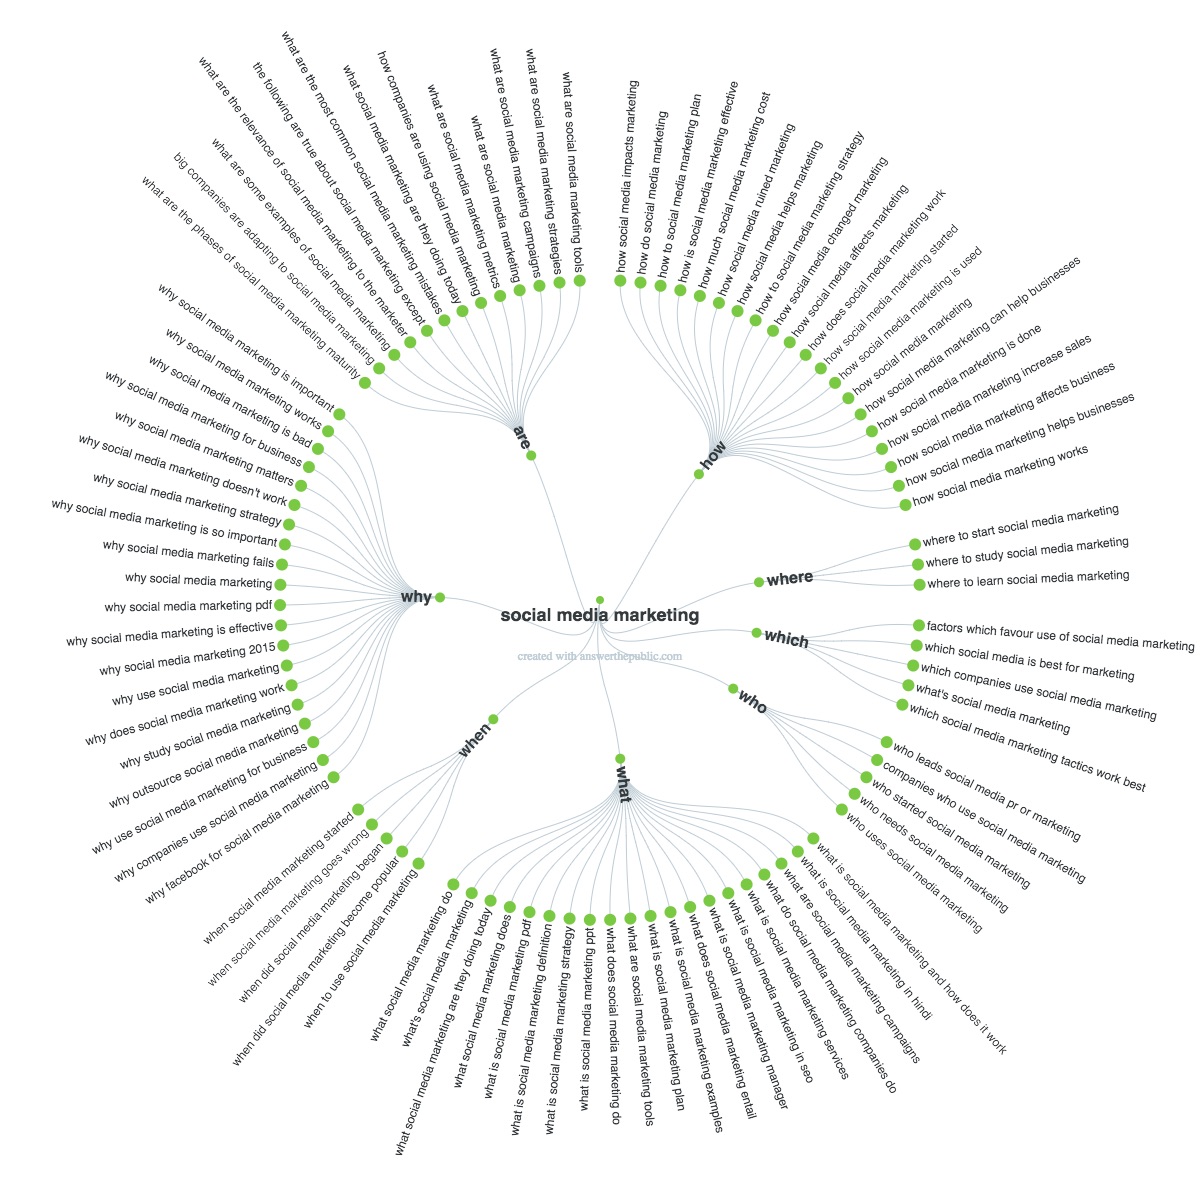
social media marketing questions

If you find it difficult to keep up with the visualization wheel, click the “Data” tab to see the content in organized boxes instead.
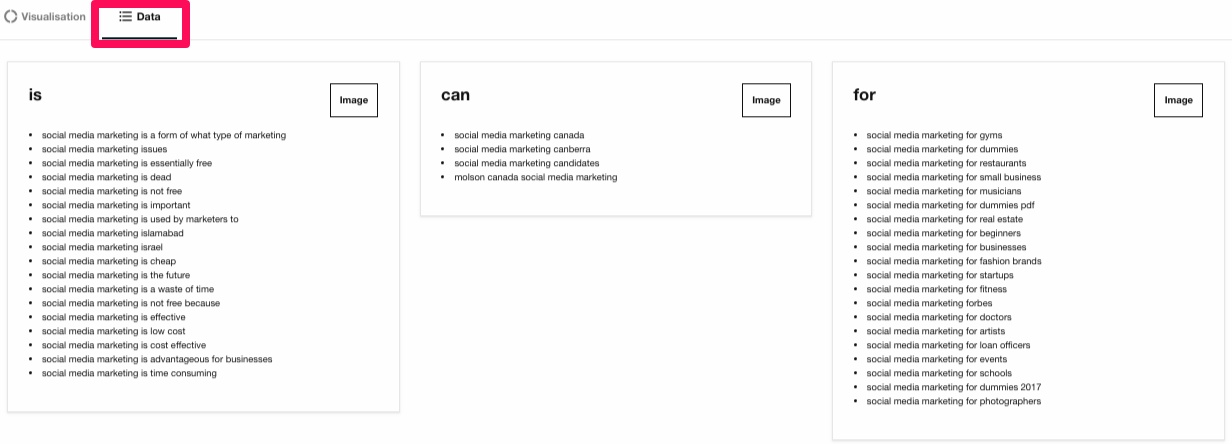
data tab answer the public

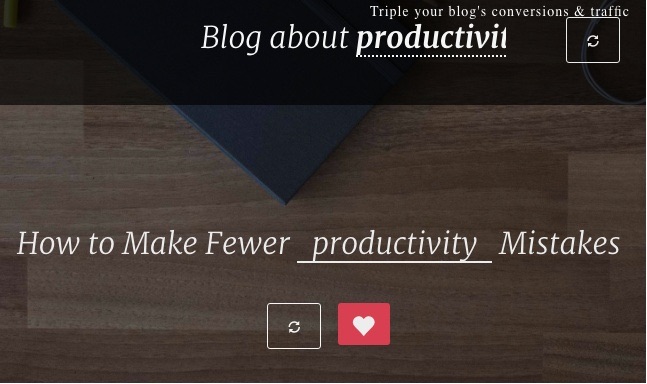
Another great tool for coming up with content ideas is the Blog Title Generator from BlogAbout. Just click the “Refresh” button until you find a theme you like.
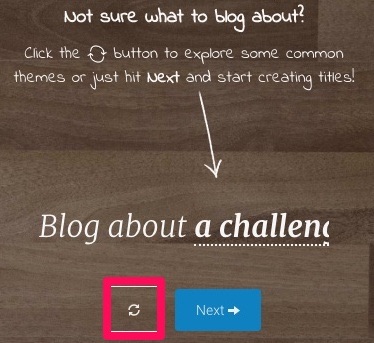
content generation ideas for linkedin pulse

Hit “Next” when you’re ready to focus on creating the title for your new post.
Once you have your topic ready to go, you can begin writing. Once you’re done writing, you’ll need to add an image.

Step 2: Create and add an image.

All Pulse posts allow you to upload a header image. The best size to upload is 600 x 322 pixels (or double that size at 1200 x 644 pixels).

If your photo is larger, you can drag and reposition it to fit the header space more effectively.

linkedin pulse cover image

You can use free, high-resolution stock photos. Or, if you want to be more creative, you can create your own.

It’s easy to create custom blog graphics with Canva.

Just sign up for an account or log in if you already have one.

Then, click on the “Use custom dimensions” button. Canva doesn’t have a template for LinkedIn blog images yet, so you’ll need to manually enter your desired dimensions here.

create a design linkedin pulse

Next, use a free photo that Canva provides or upload your own image. Scale it to fit the space correctly and try out a few filters.
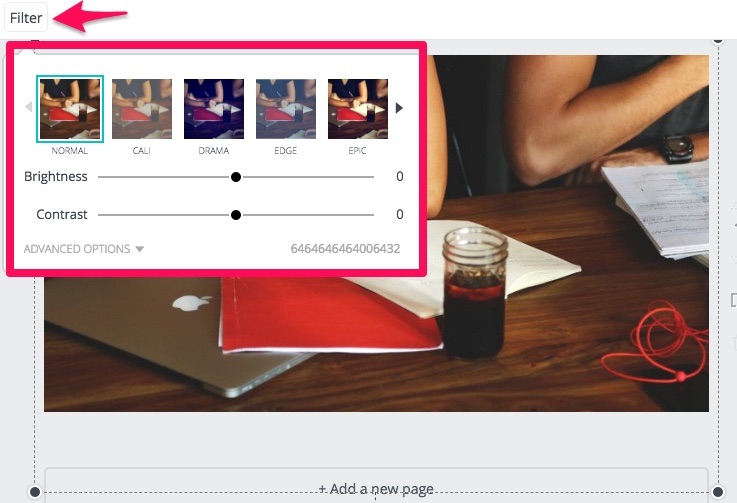
filter linkedin pulse image

If you want, you can even add the text (such as the title of your post), enter in some graphics (like your logo), or add a few icons.
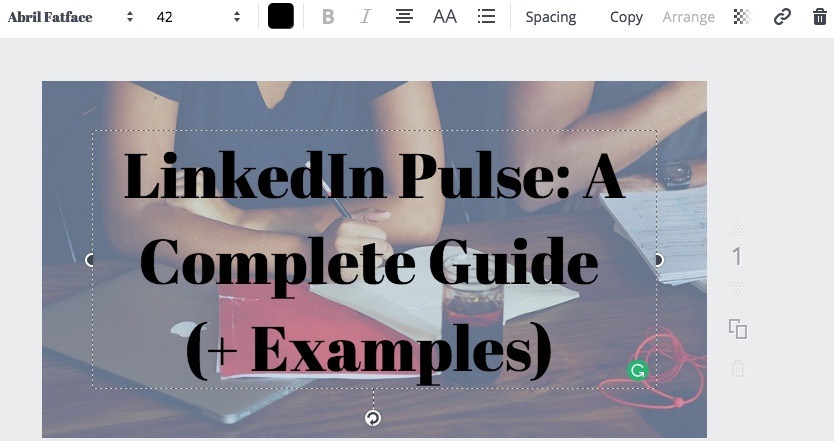
creating headline on linkedin pulse

Once you’re done, go ahead and download the image. From there, upload it to LinkedIn.

You’ll need an eye-catching headline to accompany your image.

Step 3: Write your headline.

Aside from your photo, your headline is one of the most vital aspects of a successful Pulse post.

This is what readers will look at to decide if they’re interested in what you have to say.

Write a concise, interesting headline that uses keywords that are relevant to your post.

Use numbers, facts, and statistics to create the impression of authority.

Use powerful word choice to pull readers in. Intrigue readers with words like “amazing” or “fascinating.” Create drama with words like “kill,” “fear,” or “death.”

Keep things short, sweet, simple, and to the point. If your headlines are too long, save some of the information for your introduction.

Now, you’re ready to finalize your post.

Step 4: Finalize the post.

You have your image, headline, and content where you want them. Next, you should finalize your article.

The “Publish” button is in the upper right-hand corner of your screen. Before you press it, make sure that you’ve formatted your post correctly.
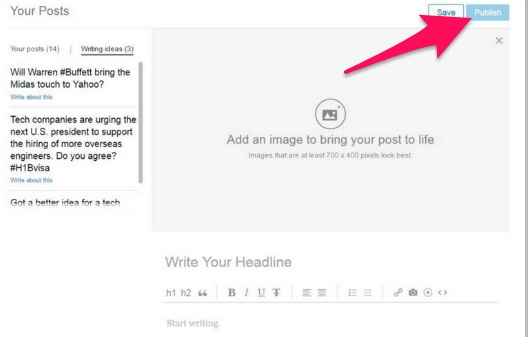
publish button on linkedin pulse

Add in block quotes, bullet points, images, or videos and correct any header mistakes.

If you choose to include links, double-check that they send readers to the right places.

Check spelling and grammar. Typos and bad punctuation can ruin an article’s success in the blink of an eye.

At the end of your post, you can add up to three tags to help users discover your content. These tags will influence the channels that your article may appear on.

It’s best to add all three tags to take full advantage of this feature.
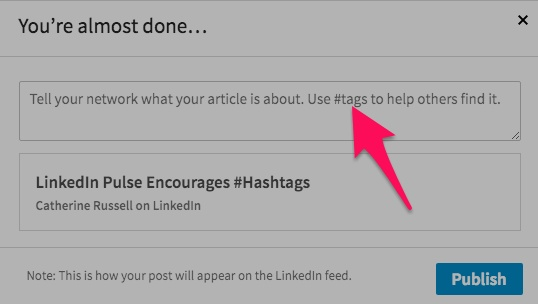
add tags on pulse

Once you’ve double-checked your content and added the appropriate tags, you’re ready to officially publish it.

Step 5: Publish your post.

LinkedIn doesn’t yet allow you to schedule Pulse posts for future publication.

If you don’t want to publish your article just yet, set yourself a reminder to log into LinkedIn and publish it when you want it to go live.

Once you do hit publish, the post will become part of your profile and will appear in your “Posts” section.

Your followers and connections will receive a notification about your newly-added content.

It will show up in their notifications, within their feed, and via email if they’ve subscribed to daily emails from Pulse.

Any members who aren’t following you but fit within your industry or share similar connections may also receive an update about your post, which could convert them into a follower.

Your post will be searchable both on LinkedIn and off of it.

Create a content calendar so that you will have a clear schedule for future LinkedIn Pulse articles.

Don’t forget to create a content calendar

A content calendar will save you time in the long run. It will help you schedule out your content and keep it organized.

If you spend time brainstorming content topic ideas now, you won’t have to do it when you’re ready to sit down and write.

With a reliable stream of content, your readers will stay engaged.

Try out a tool like Trello for creating your very own LinkedIn Pulse content calendar.
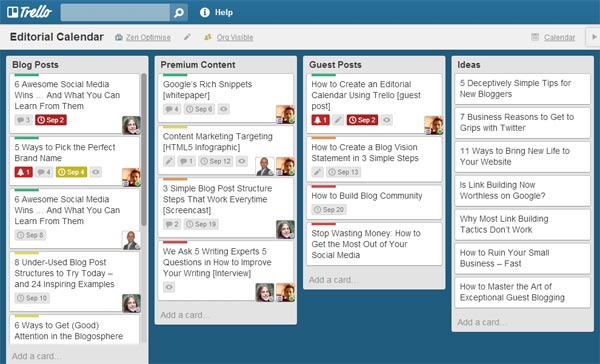
pulse editorial calendar on trello

You could even create a theme-based weekly post or round up that is exclusive to your Pulse readers like NPR’s Weekly Roundup:
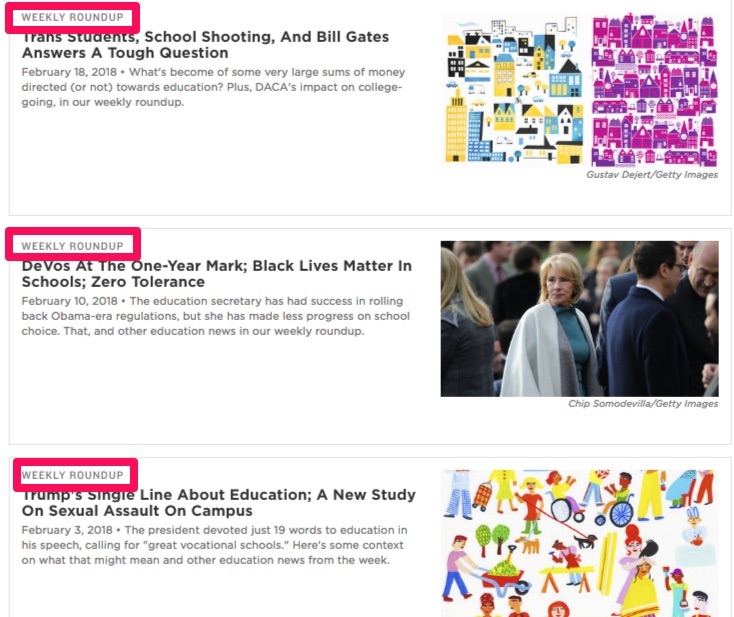
npr weekly roundup

Plan your calendar out for one to six months.

Schedule as far out as possible so that there’s no question about what you should be working on, when you should work on it, and when it should go live on Pulse.

You should also plan to announce large events on LinkedIn like webinars, Q&As, interviews, product releases, conferences, and more as soon as you’ve committed to a date.
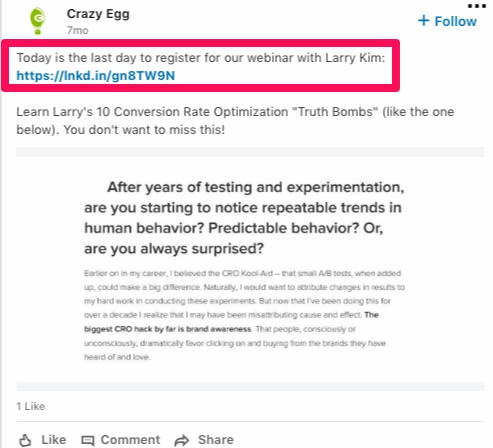
crazy egg post share on linkedin

Add these announcements to your content calendar, too.

You should also test content before adding it to your Pulse calendar. Does it match your other content marketing efforts? Would you share it yourself?

You don’t have to set your calendar in stone, either. Keep an eye on your surroundings and competition. If something is trending, take advantage of it.

What topics are your competitors talking about? How do your reader analytics look? If a topic just isn’t working, don’t be afraid to pull it.

How to boost your results on LinkedIn

There are a few things that you can do to elevate your posts on LinkedIn for the best results possible.

For example, you should use keywords on Pulse posts just like you would on regular blog posts.

Review profiles of others within your industry. What keywords are they using?

Make a list of industry-related keywords and include them with each piece on your content calendar.

Next, make sure that you’ve completely filled out your profile. As you fill out more content on your profile, the “Profile Completeness” or “Profile Strength” circle will fill in.

Try to get that circle to be 100% blue since complete profiles usually rank higher on searches.
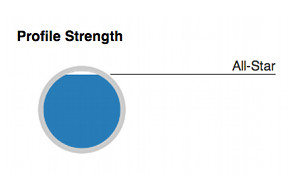
linkedin profile strength

To complete your profile, head to the “Profile” navigation bar on your account.

Click “Edit Profile” and fill out every section.

Be sure that you have a profile photo on your account. Update it regularly to match the photos you’re using on other sites. That way, people will immediately recognize you and your company.

You should also join LinkedIn groups related to your industry. Click on “Groups” in the navigation bar of your LinkedIn homepage.
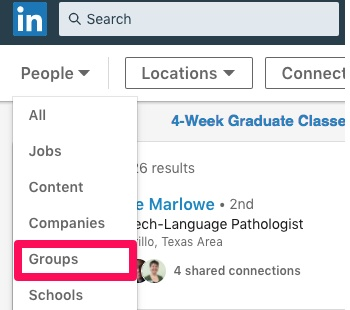
groups selection on linkedin

Then, search through groups that LinkedIn recommends for you.
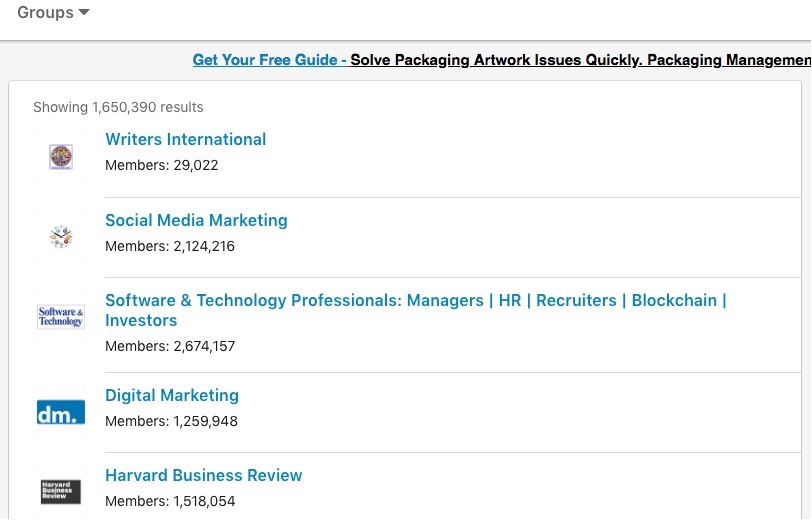
group listing on linkedin

Join a few you like and share your content there. Engage with other members’ posts, too.

You’ll also want to keep in mind that profiles with regular updates have increased visibility. You can stay active by simply updating your LinkedIn status frequently.

This doesn’t have to be difficult. When you have news about your business, make a point to share it with your audience.

Now that you understand what LinkedIn Pulse is and how it works, you might be wondering if you should treat it the same way you treat your blog. The short answer is no.

LinkedIn Pulse vs. your website blog

When you publish an article on your blog, you publish it on your terms.

On LinkedIn, you’re publishing on LinkedIn’s platform and LinkedIn’s terms instead of your own.

LinkedIn chooses how to show and share your articles. If you want Pulse to recommend your posts, you have to play by LinkedIn’s rules.
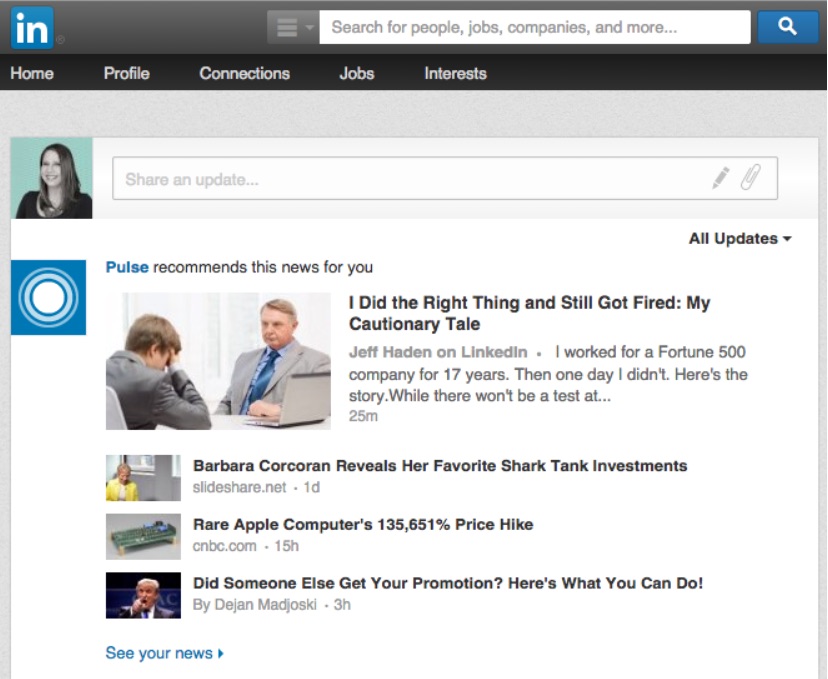
linkedin pulse shared articles

On your own blog, you can set up automatic sharing to social media, schedule out posts, and run your site the way you want to.

That isn’t the case on LinkedIn.

When you publish on your own website, you gain SEO benefits and an increase in traffic for posting articles.

When publishing on LinkedIn, you have to remember to link back to your site for the same results.

You might be thinking that you can just publish the same article on your website and LinkedIn to “double dip” and get the best of both worlds.

But that could actually cause more harm than good.

When your content appears twice on the web, it creates duplicate content. Google doesn’t like duplicate content, and it will penalize websites where the content shows up last.
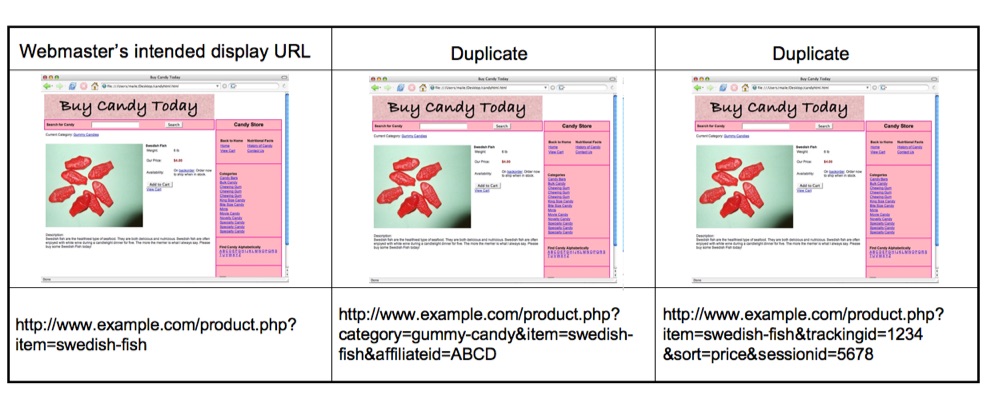
duplicate content

If Google can’t figure out who posted the content first, it will penalize both websites. That means no ranking, which is not good.

If you still want to publish on both platforms, there are two ways that you can do it:

  • Rewrite articles and publish two different versions.
  • Publish the full version to your website and write a teaser post on LinkedIn that directs users to your site to read the rest of the article.

For example, take this Neil Patel blog post about LinkedIn sales funnels.
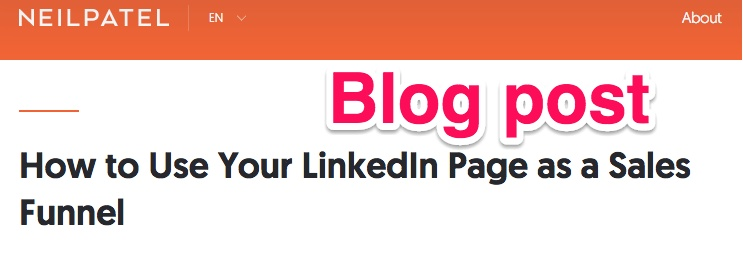
neil patel blog post about linkedin

The LinkedIn post of the same article features a “Click to continue reading” button that directs users to the rest of the post on the website.
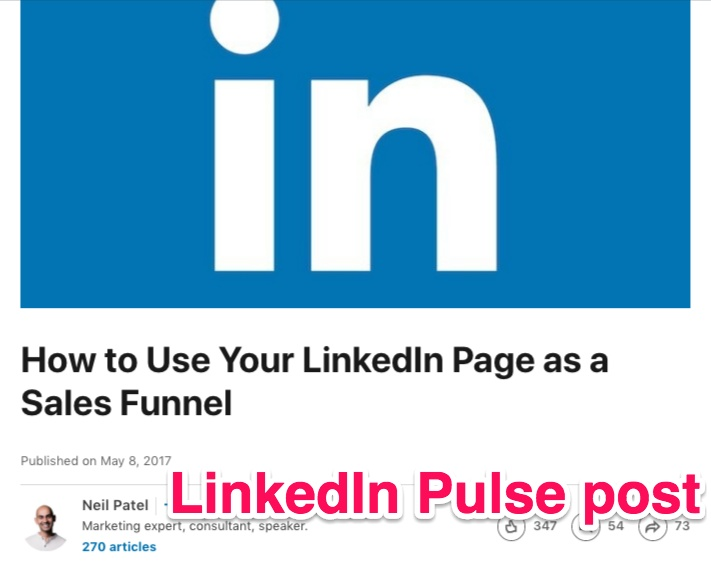
neil patel linkedin pulse post

There are many ways to leverage the power of your LinkedIn network.

You can still use LinkedIn Pulse while also optimizing your site with blog posts. You don’t have to choose one or the other.

Conclusion

Sometimes, the reach you already have on your website just isn’t cutting it. That’s why you should diversify your content to get as much engagement as possible.

By being active on several different platforms, you can gain more views, followers, readers, and customers.

But most businesses and influencers don’t know that they can post full articles on LinkedIn with LinkedIn Pulse. It’s LinkedIn’s news aggregation platform.

By using LinkedIn Pulse, you can connect with your target audience, engage customers by writing useful content, and establish yourself as an industry thought leader.

Pulse works by notifying users of recommended content based on their connections, industries, and interests. Users can follow brands, influencers, topics, and more.

To publish on Pulse, choose a message and start writing. Create and add a header image that is 600 x 322 pixels. You can use a stock image or create your own on Canva.

Then, write out an engaging headline. Keep it short, simple, and intriguing. Use numbers, statistics, and facts.

Finalize your post. Double-check that you don’t have any grammar or punctuation mistakes within your article. Fix formatting errors and add tags to your post.

Then, publish your post to send it out to followers, connections, and others within your industry.

Like most places, consistency is key on Pulse.

Don’t forget to create a LinkedIn Pulse content calendar to plan and organize content one to six months in advance. Use a tool like Trello to brainstorm and keep track of ideas and due dates.

Boost your results by completing your profile, joining groups, interacting with other users, posting status updates, and targeting keywords with your posts.

Never post the same content on Pulse as you post on your blog. If you do, Google might penalize your website.

To avoid a penalty, you can either write two different versions of your post or only share a snippet of your full article on Pulse with a link to your website where users can continue reading.

Take advantage of LinkedIn Pulse today to boost your brand awareness and engagement online.

How have you taken advantage of LinkedIn Pulse within your industry?

About the Author: Neil Patel is the cofounder of Neil Patel Digital.

Google

VIDEO: Does Marketing Automation Work For Luxury Brands?

email marketing agency pricing

Previously, we looked at the importance of building Buyer Personas in luxury brand marketing. Buyer Personas set a solid foundation for your content marketing strategy by taking into account two of the biggest differences between the Luxury Living Buyer and other niche markets: a longer time needed for consideration and research, and a mindset that prioritizes value over price.

When your business depends on luxury buyers, you can't just sit back and wait for their money to come to you. The mission of your marketing team is to prove the value behind your pricing structure, using proven content marketing strategies that meet your prospective customers right where they are. 

These strategies often involve some serious time investment, and one cost-effective solution to that problem is marketing automation. How can using automation help you reach a buyer who is searching for very specific answers to their important questions?

Let's start with a (very) short video.

Google

Wednesday, April 4, 2018

What is Vero? 9 Things About the New Social Media App

email marketing best practices

Remember Orkut? Or Friendster? How about MySpace and Classmates?

Maybe you do, maybe you don’t, because social media platforms come and go faster than most of us can keep up. For every success like Snapchat, there are plenty of others that failed to gain any serious momentum, even if they were fun and innovative ideas.

Are you familiar with Vero?

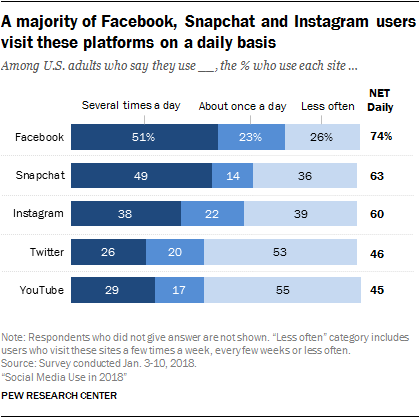
You know Facebook, of course, and Twitter, Pinterest, Instagram, LinkedIn, and WhatsApp. They’re good (though not perfect). You probably use them at least once a day.

social networking platforms like vero used daily

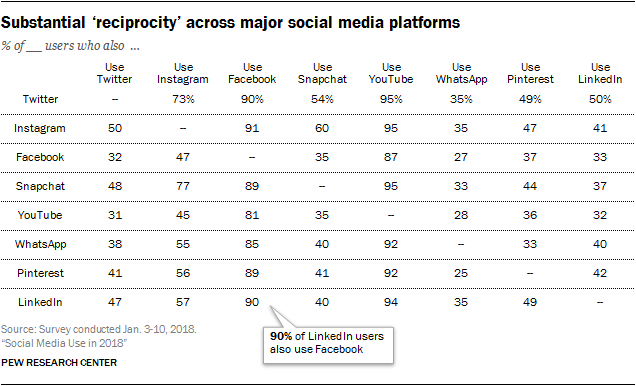
But we don’t find one platform that we like and stop. According to a recent study of social media in the United States, most people use an average of three of the top eight platforms.

Facebook and YouTube are used by a significant percentage of those on other sites and apps. Consider them the stalwarts. Most people have an account on those two behemoths (Facebook has 2.167 billion and YouTube 1.5 billion users) and at least one other platform.

reciprocity across social media platforms like Vero

But do you know Badoo, Snapfish, Tout, or Line? The point is, there are hundreds of social media platforms out there that you’ve never heard of, for virtually every niche, interest, or group of people.

Some won’t make it or be worth your time. But others may be the platform you’ve been looking for…

And that brings us back to Vero.

What is Vero Social Media?

The words “revolutionary” and “game-changer” are tossed around too much these days.

That said, I’m going to throw caution to the wind here. What is the Vero app? It’s nothing less than the evolution of social media. It’s both revolutionary and a game-changer. It’s true social.

Vero labels itself “more social, less media”, and with its focus on providing a natural and ad-free experience, it’s hard to argue with it. Initially launched a couple of years ago by billionaire Ayman Hariri, movie financier Motaz Nabulsi, and venture capitalist Scott Birnbaum, the platform has only started to take off recently.

Why exactly is anyone’s guess, but growing frustration with Instagram and its incredibly unpopular algorithm, combined with a growing number of data leaks on other platforms, may have been the catalyst.

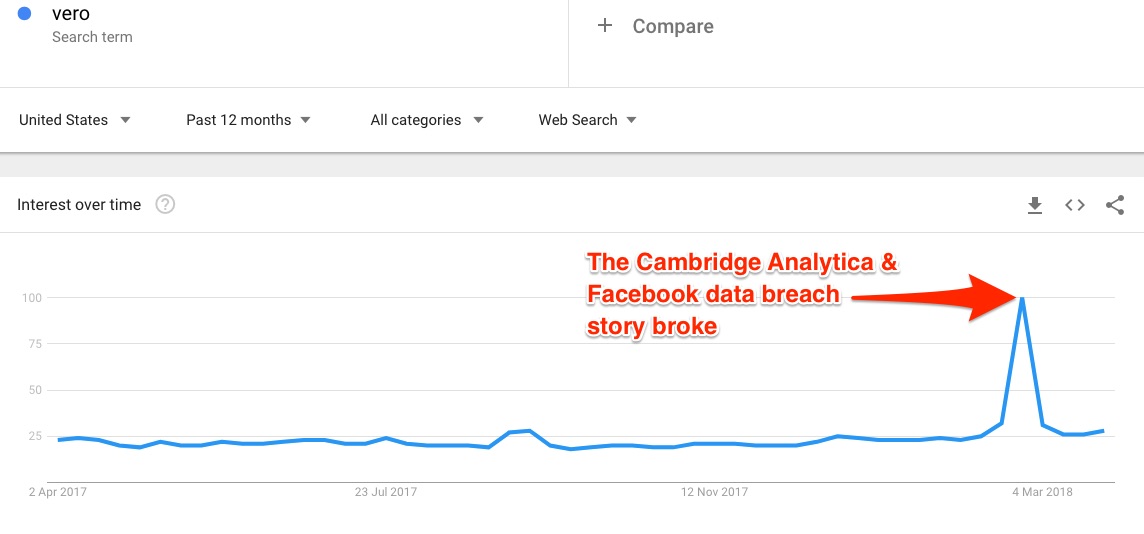
vero spike on google trends

According to Google Trends, Vero’s popularity as a search term has been steady albeit not spectacular over the past year. The spike seen above occurred around the time the Facebook data breach became big news and people were looking for alternatives.

Regardless of why, the app shot up from outside the top 1500 on the App Store, to #566, and finally #1 over the course of just a few days. It has since gone down again, but is seeing faster growth than at any other time in its history. Vero recently passed 3 million downloads.

“We wanted to build something that stood for something beyond a gimmicky, one-feature thing. We wanted it to be an extension of how you want to express yourself. [On other social apps] you’re performing for the crowd. Research shows that people are becoming more and more negatively affected by having to do that all the time. We wanted to create an online social network … that allows you to just be yourself.”

~Ayman Hariri, CEO of Vero

The Vero app strives for transparency where the other platforms prefer working behind the curtain.

Vero v. Instagram v. Facebook v. Twitter – Differences

On the surface, the Vero app is very similar to mainstays like Facebook, Twitter, and Instagram. You can post photos, videos, and links, share locations, or recommend books, music, and films. Others can like and comment on what you share. Sound familiar?

But it distinguishes itself in some very important ways: No ads. No algorithms rearranging your posts and limiting who sees what. No data mining. Chronological feeds.

In fact, Vero makes public its manifesto and business model for anyone interested in what they do, and why they do it. Vero believes that people naturally seek connections, and that explains the explosive growth of social media over the past 10-15 years.

Here’s what it all boils down to according to them:

But as time passed, an imbalance began to form between the interests of the platforms and the best interests of the users. We made our business model subscription-based. making our users our customers, not advertisers.

Basically, you are the product sold to advertisers on other platforms. Facebook makes billions selling ads to brands and companies based on the data they collect from their 2.167 billion users. You are not a customer to them. You are a product to be sold.

The same is true for Twitter and Snapchat and Instagram (owned by Facebook, lest we forget).

Vero takes the opposite approach. By using a subscription-based model, they’re beholden only to their users.

Every decision, every tweak, every new feature, every change to their design and interface needs to keep their users happy and satisfied. They need to respond to the needs of their users. They have to address the complaints of their users.

The user is the customer. The platform is the product. And that is a revolutionary idea in social media.

But that’s not all. Facebook, Instagram, Twitter, Snapchat, LinkedIn, and others want you to spend as much time as possible on their platforms. They want you to engage in mindless scrolling of feeds for hours each and every day, because they collect data on your browsing behavior.

The more users they have, the more they can charge advertisers.

The longer you spend browsing feeds – which are increasingly becoming mostly ads and sponsored content – the more they can parade those statistics in front of their customers.

1.40 billion daily active Facebook users who spend an average of 20 minutes on the platform each visit is an enticing potential audience for an advertiser.

American adults spend an average of 25.29 minutes per day on Facebook. And they want you to continue doing that.

You don’t need me to tell you that social media is addictive. It’s designed that way. In fact, Facebook, Instagram, and Twitter send out notifications intended to pull you back in to their platform over and over again throughout the day.

Here, once again, Vero sets itself apart.

While they do want you to use and enjoy the app, they also want you to be aware of how much time you spend on it.

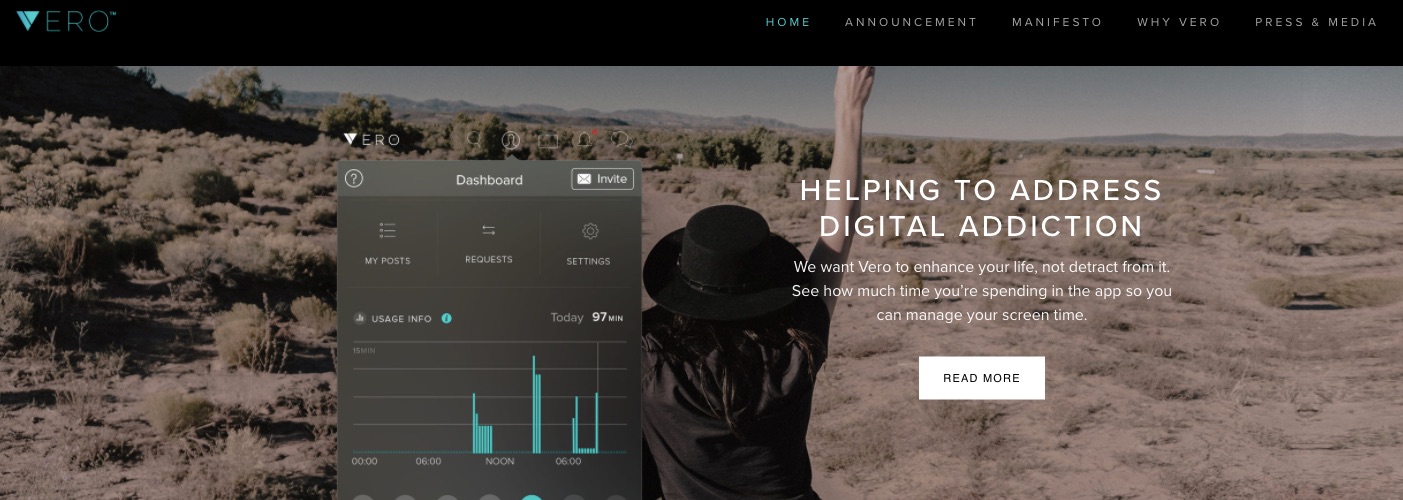
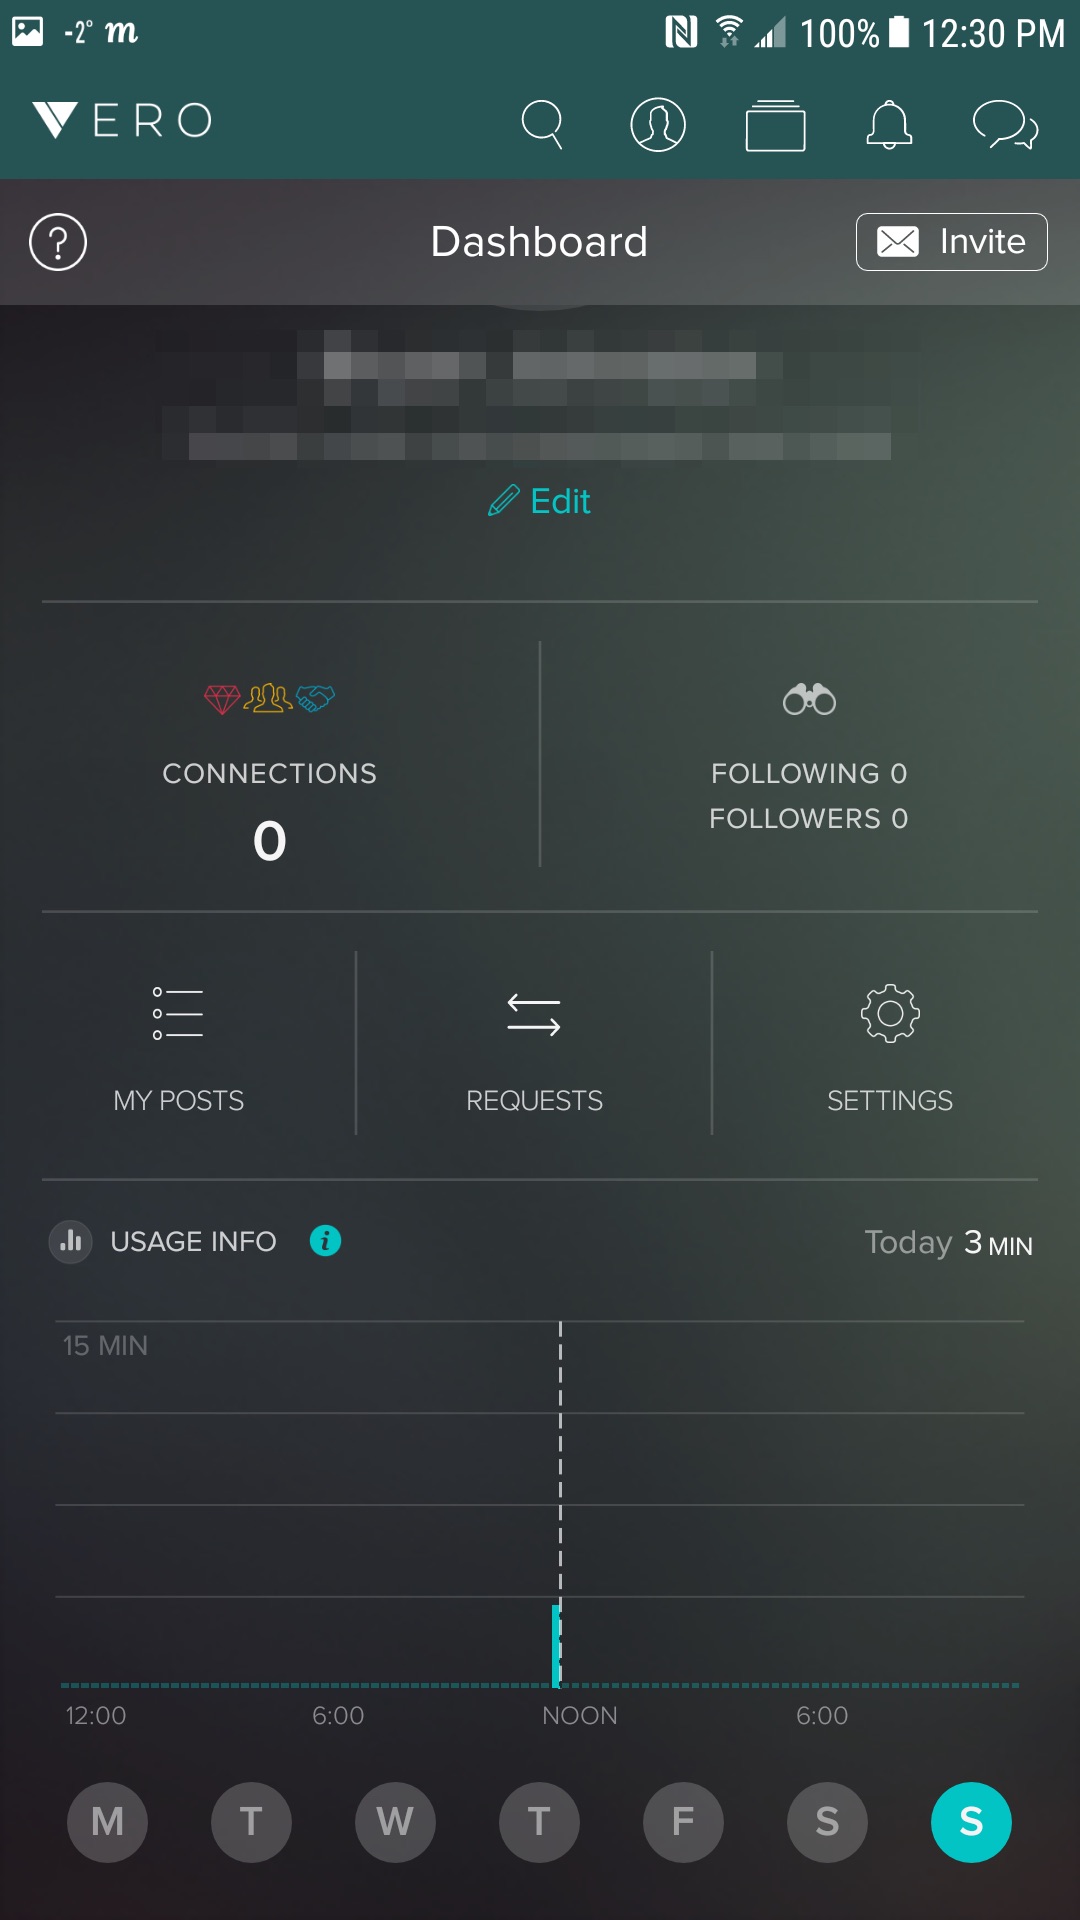
To that end, there are no push notifications, and they are the first and only social media platform to include usage info on your dashboard. You can quickly see how much time you’ve spent on the app each day and each hour of that day.

vero homepage in 2018

The others don’t want you to think about that. Vero very much does. As they say, “social media should enhance your life, not detract from it.”

That too is a game-changer.

9 Things You Need to Know About Vero

There’s always a bit of a learning curve when you start using a new app or service. New features, new ways of accomplishing tasks, new terminology, and so on.

The Vero app is similar to other social media in some ways, and very different in others. It’s not well known…yet. Let’s take a closer look.

1. Vero was Launched in 2015

As mentioned earlier, Vero is no overnight success. It was launched in 2015 to little fanfare, and failed to generate much attention. It did reach #45 on the App Store, but quickly fell out of the top 1500 apps on the platform.

Its popularity over the past few years has been steady but unremarkable, with just a few hundred thousand downloads prior to its recent surge. But, as the saying goes, slow and steady wins the race.

Towards the end of February 2018, it had about 500,000 users. It doubled that in just 24 hours, adding 500,000 new users on iOS in the US alone.

Vero hit 3 million registered users on both Android and iOS in March 2018.

2. The App was Started Because of Personal Frustration

The men behind Vero weren’t looking to revolutionize the social media landscape. They were simply frustrated with what was available, and the pain-points of the major platforms.

vero team

To begin with, feeds on Facebook, Instagram, and Twitter are subject to some mysterious algorithm that decides what to show, who to show, and when to show it. Those sites long ago abandoned the chronological feed, showing content from newest to oldest, much to the chagrin of users.

And then, of course, there’s the advertising issue. Over the past few years, the amount of ads and sponsored content in a typical feed has been creeping up. Platforms like Facebook are funded by those advertising dollars, so they’re more concerned with keeping their advertisers happy than their users.

“When I did [join existing social networks], I found the options for privacy were quite limited and difficult to understand, and when I decided to get on and connect with a few of my friends, I noticed that their behavior online was very different than their behavior in the real world.”

~Ayman Hariri

On traditional social media, we tend to overshare and – for lack of a better word – “exaggerate” our accomplishments and activities because it’s going to be seen by everyone.

The team behind the Vero app wanted to eliminate all of that.

3. Posts Can Be Photos, Text, Music, or TV shows

Or places, videos, films, and books. This allows you to truly share where you are, what you’re watching, reading, or listening to with your connections.

The app is geared towards a visual experience – just like Instagram – so even a post about a book you’re recommending will automatically feature an image of the cover. Likewise for a song, album, movie, or television show.

Photos and videos can be shared from your gallery, or you can opt to take a new one with your camera directly in the Vero app.

4. Friends v. Followers

They’re not the same.

Friends are people you actually know in the real world.

Followers (or fans) are those that choose to follow your account for some reason, usually because they enjoy your content.

Would you share some big news or a personal tragedy with strangers on the street? Probably not. You’d go to your close friends. But on social media, it’s an all-or-nothing situation that demands we either share with everyone or no one.

Vero makes it easy to differentiate between the two groups. In fact, they’ve created 4 categories (more on that in a minute).

5. Vero is Free. For Now.

The app will eventually work on a subscription model, requiring users to pay a few dollars each year.

When they first launched, Vero planned to give their first million users a free-for-life account, but with their recent uptick in downloads, that offer has been extended.

It won’t last forever, though. In order to provide that ad-free experience, they do need to generate revenue in some way.

The subscription fee – which will likely be less than the price of a cappuccino at Starbucks once every 365 days – will allow them to keep advertisers out and the customer experience their main and only concern.

In addition to that, Vero is using affiliate links on recommendation posts.

Click on a book, song/album, or downloadable film or show, and you’re instantly taken to the corresponding purchase platform where you can opt to buy it. If you do, a small portion of that sale will go to Vero.

6. You Can’t Register for Vero on Their Website

Registration for Vero can only be done via the app. There is no option to sign up on their website.

7. Users Can Categorize “Connections”

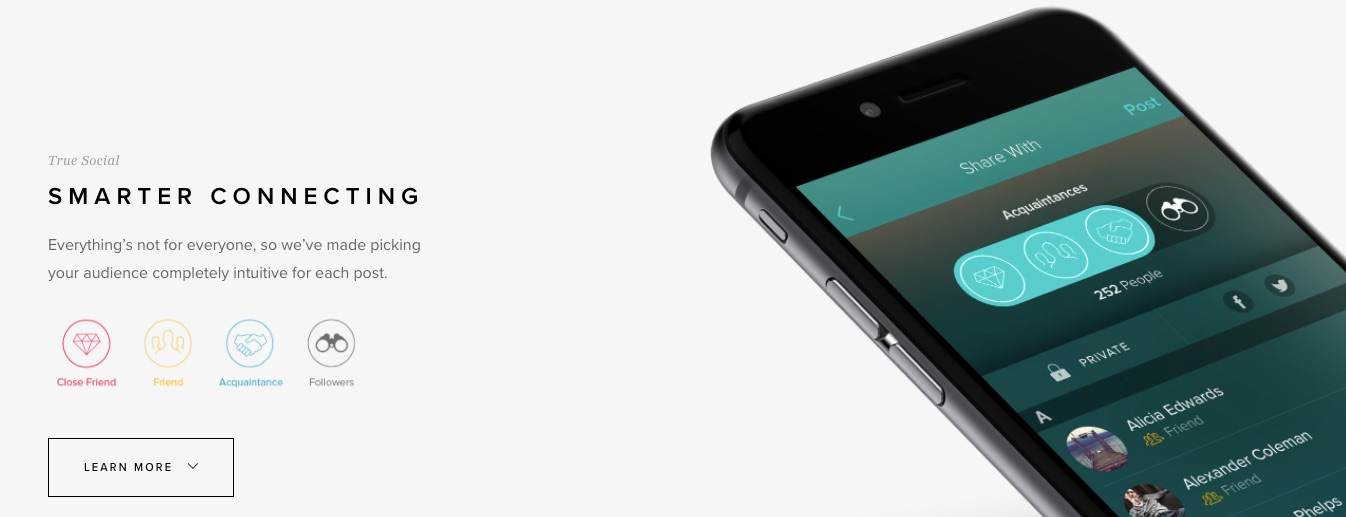
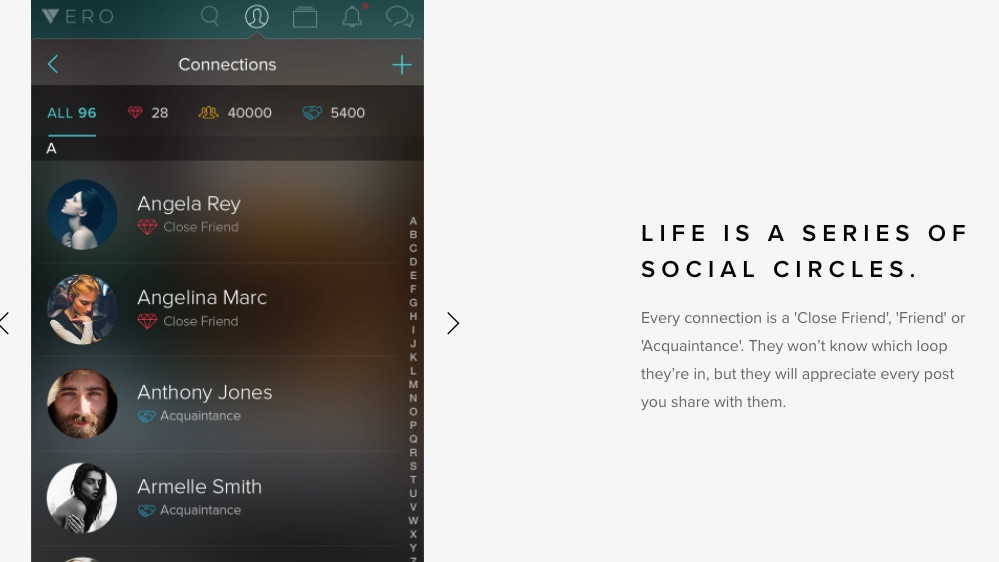
This is another key differentiator between Vero and Twitter, Instagram, Facebook, and the like. Instead of only having one large group – fans/followers – there are actually four different categories for each connection you make:

  1. Close Friends
  2. Friends
  3. Acquaintances
  4. Followers

vero app smarter connecting

Every time you publish a post, you’ll be able to select which groups will see it with a simple sliding bar.

Want to share something with only your closest friends? No problem. Have another post to send out to everyone? Piece of cake.

You have complete control over who you share with…just like in real life.

8. Vero’s Interface is Different from Facebook and Instagram

You’ll immediately notice the color scheme is nothing like the other platforms. We’ve all experienced the slap-in-the-face bright light that comes with checking your Facebook feed at night. Vero uses a black background with white text and teal highlights. It looks great, and is much easier on your eyes.

There are no usernames on Vero like we see on Instagram and Twitter. You set your first and last name, and that’s what people see on your posts (although there’s nothing stopping you from using something other than your actual name).

And if you’ve ever struggled with making your photo fit the required square or rectangular shape and still look great, you’ll appreciate the fact that Vero accepts images of all shapes and sizes. No cropping required.

You can choose to edit your photos in the app itself – including a variety of filters like Instagram – but you don’t have to make any changes if you don’t want to.

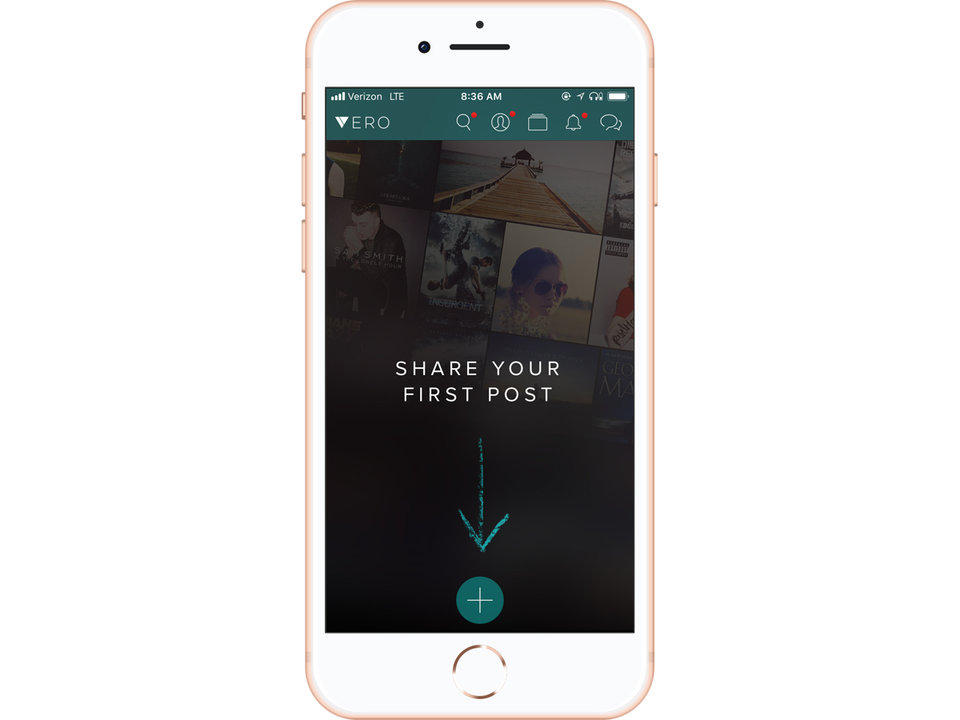
Along the top of your homepage, you see five icons (L-R): search, your user profile, collections (everything shared with you is organized into categories for easy search and retrieval), notifications (you’ll receive one whenever someone wants to connect with you so you can accept and categorize them…but don’t worry, as only you can see what category you’ve assigned them), and chat.

share your first post on vero

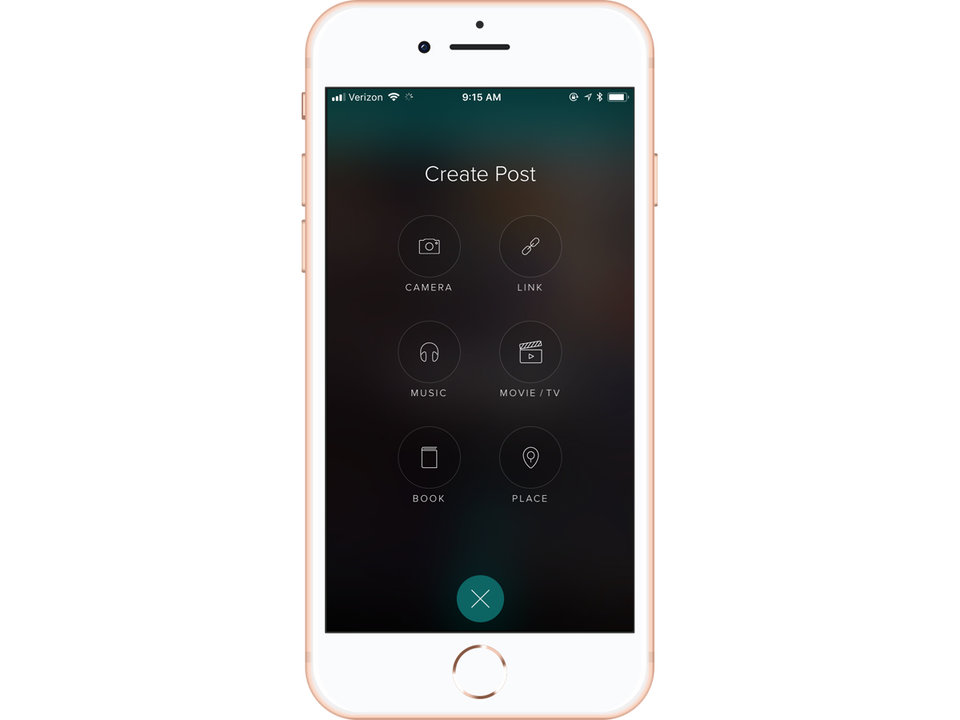
Hit the “+” button to share a new post, and you’re whisked away to the Create Post page. Select your post type – Camera (including stuff from your gallery), Music, Book, Link, Movie/TV, or Place – and share. Make a recommendation (or not), add a comment (or not), and finally select the connection categories that will see it. Done.

create post in vero

From your user profile dashboard, you can manage your connections and account settings, review your previous posts and those shared with you under collections, send and review connection requests, and monitor your usage info.

dashboard in vero

9. You Can Add an Avatar

I know what you’re thinking: big whoop. All social media platforms let you set a profile picture or avatar. That’s true.

But Vero takes it a step further and lets you set up to three different avatars for the three main categories of connections. Your close friends will see Avatar A, while acquaintances will see Avatar B.

You may want to have a bit of fun with your “close friends” avatar while presenting a more professional image to your “acquaintances”. Head to Settings > Avatars > Use Three Avatars, and select the image you want for each group. Easy.

Should You Join?

It depends. Vero is a relatively new social media network, and that comes with some growing pains and glitches. The app is officially still in Beta.

It has somewhere in the vicinity of 3 million users so far, but that obviously pales in comparison to Facebook’s 2+ billion, Instagram’s 800 million, or Twitter’s 330 million. If you’re looking for everyone to be there, you may want to wait a bit longer.

Some big names have already jumped on the bandwagon, though, including Rita Ora, Selena Gomez, and Zack Snyder. Look for the check mark icon to indicate an official and verified profile, but be aware that your favorite guilty pleasure (Kim Kardashian, anyone?) may not be there.

But – and this is very important – if you’re tired of the ads, the algorithms, and the extinction of the chronological feed, then yes, you should join.

How to Use Vero

If you’ve ever signed up for a social media account, you’ll find Vero a breeze to get going. Even if you’ve never had a social media profile (those people still exist, right?), you’ll still find it a piece of cake.

1. Download the Vero app

Vero is available for both iOS and Android.

2. Sign up

Once you’ve downloaded and installed the app, you’ll have to provide a few details to get registered: your first and last name, your email address, and your mobile phone number. Within seconds, you should receive a text message with a 4-digit PIN that you need to enter in order to continue. This is used to verify your telephone.

3. Add an avatar

After registering and verifying your details, you can write your brief bio – you’re given up to 150 characters – and select your avatar from either your image gallery, or by taking a new photo within Vero itself.

4. Add connections

Your feed may look a little neglected at first because you’re not following anyone and you haven’t posted anything yet. But that’s easy to fix.

You can search for profiles to follow by name, hashtag, or keywords. Find the personalities and brands that matter to you, and follow them. Reach out to your friends, and connect (and assign them an appropriate connection category).

Add new connections at any time by clicking the teal + in the top-right corner on your connections dashboard.

connections in vero

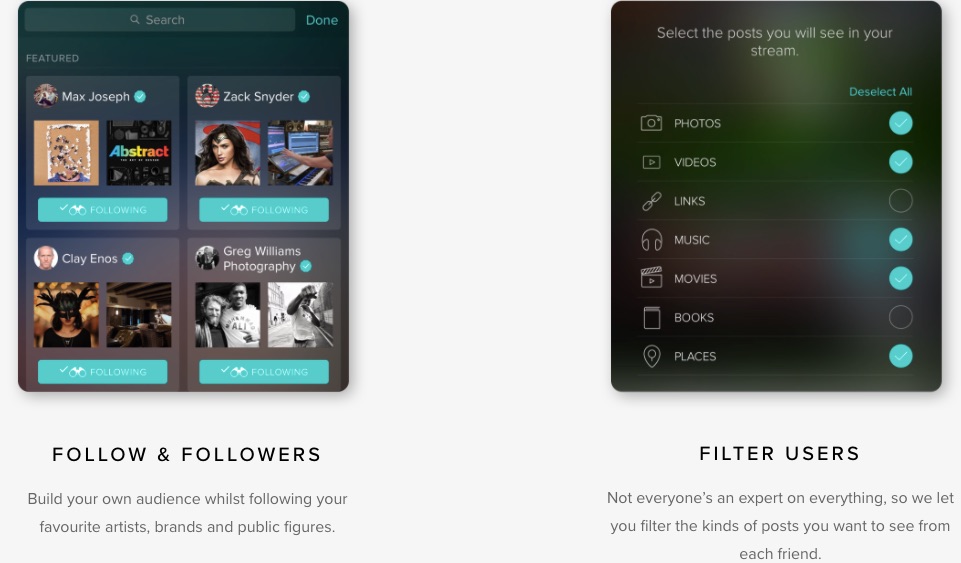
Another great feature in Vero is the ability to filter what you see from every connection. Have that one friend who posts 30+ cat videos every day of the week? Turn off videos for that one person, and those damn cats will never clog your feed again.

follow and filter in vero

5. Start posting

With a few connections under your belt, click the “+” button and make your first post. Share what you’re reading, watching, or listening to right now. Or let others know where you are right now. Or share a thought, photo, or video.

With its unparalleled control, you only share what you want with whom you want, and only see what you want from whom you want.

And everyone sees it all ad-free and in chronological order.

Conclusion

Social media isn’t going anywhere. Social media marketing is a crucial cog for any business or brand. Platforms rise. Platforms fall.

Will Vero buck the trend of “suddenly popular, gone by next week” that plagued apps-of-the-week like Peach and Meerkat? Only time will tell, but you have to admire the foundation and core beliefs behind the platform.

Less media. More social. No ads. No data mining. Be a user, not a product.

True social.

Have you checked out Vero yet? Why or why not? What’s holding you back?

About the Author: Neil Patel is the cofounder of Neil Patel Digital.

FaceBook

Tuesday, April 3, 2018

Technical SEO: Why It’s Becoming More Important Than Any Other SEO Tactic

email marketing letter samples

No website can stand without a strong backbone.

And that backbone is technical SEO.

Technical SEO is the structure of your website.

Without it, everything else falls apart.

Imagine you wrote the most amazing content in the world. It’s content that everyone should read.

People would pay buckets of money just to read it. Millions are eagerly waiting for the notification that you’ve made it available.

Then, the day finally comes, and the notification goes out. Customers excitedly click the link to read your amazing article.

That’s when it happens:

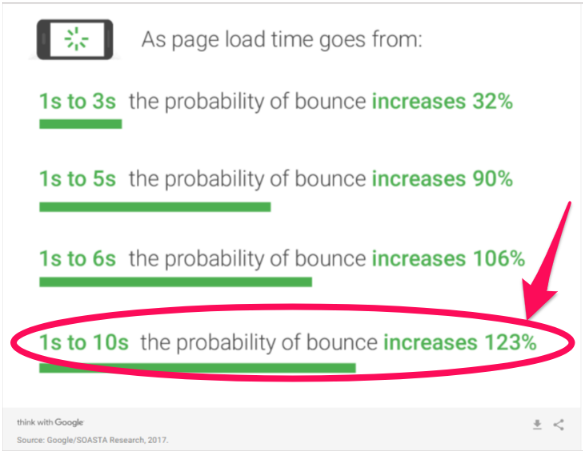
It takes over 10 seconds for your web page to load.

And for every second that it takes for your web page to load, you’re losing readers and increasing your bounce rate.

page speed and bounce rate

It doesn’t matter how great that piece of content is. Because your site isn’t functioning well, you’re losing precious traffic.

That’s just one example of why technical SEO is so critical.

Without it working, nothing else really matters.

That’s why I’m going to walk you through the most important aspects of technical SEO. I will explain why each one is so crucial to your website’s success and how to identify and resolve problems.

The future is mobile-friendly

First, let’s talk about mobile devices.

Most people have cell phones.

In fact, most people act like their cell phone is glued to their hand.

More and more people are buying and using cell phones all the time.

I actually have two of them. I own a work cell and a personal cell.

This is becoming more common as “home phones” become a thing of the past.

Google has recognized this trend. They’ve been working over the past few years to adapt their search engine algorithms to reflect this new way of life.

Back in 2015, Google implemented a mobile-related algorithm change.

People started calling it “mobilegeddon.”

This was only the beginning of Google moving the focus from computer-based browsing to mobile-based.

On November 4, 2016, Google announced their mobile-first indexing plans.

Google’s mobile-first indexing could be a game changer.

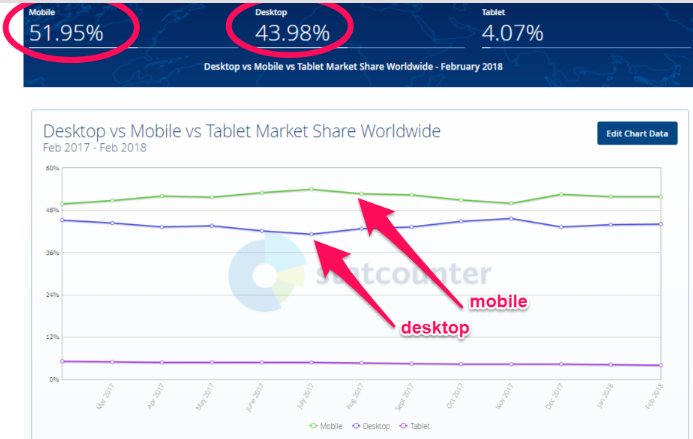
Mobile traffic is now more popular than desktop traffic.

mobile vs desktop traffic

And even more importantly, about 57% of all visits to retail websites come from mobile devices.

You can see why Google’s intention is to begin using the mobile version of websites for rankings.

Just to make sure you knew they were serious, Google reminded us of this change on December 18, 2017.

Why do we care what Google is doing?

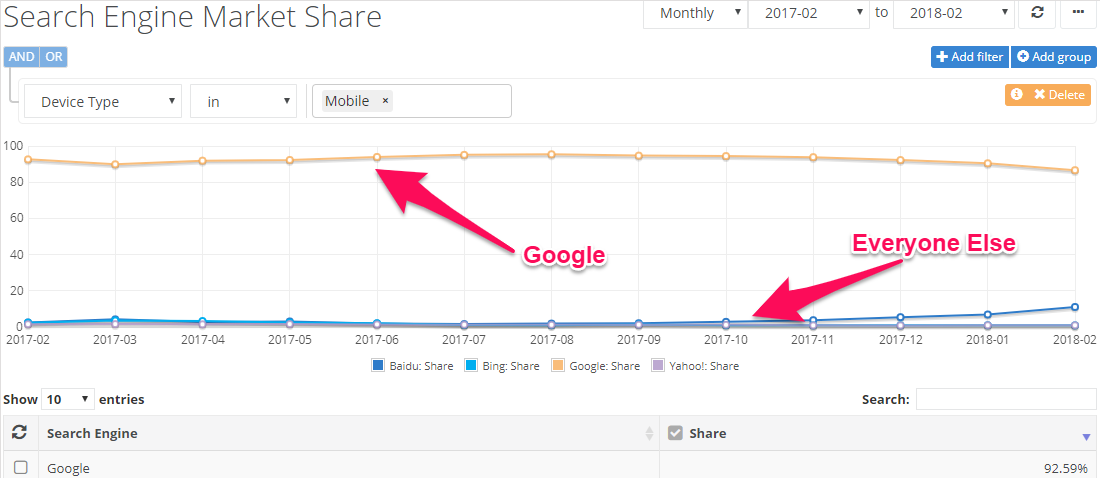
They own almost 93% of the mobile search engine market.

google owns the search engine market

In fact, mobile-first indexing has created enough conversation among marketers that it’s one of the key topics of this year’s Pubcon conference.

You need to make sure that your site is ready for this change.

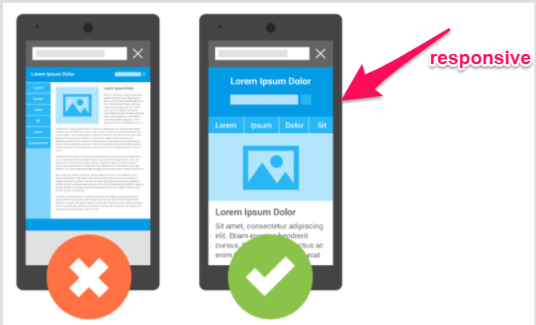
The easiest way to do this is to have a responsive site or a dynamic serving site that knows to adjust to screen size.

responsive vs unresponsive mobile site

If you have a separate site for mobile, you need to do the following:

  • Make sure that the mobile version of your site still has all of the critical content, such as high-quality pictures, properly-formatted text, and videos.
  • Your mobile site needs to be structured and indexed just like a desktop site.
  • Include metadata on both versions of your site: mobile and desktop.
  • If your mobile site is on a separate host, make sure it has enough capacity to handle increased crawling from Google’s mobile bots.
  • Use Google’s robots.txt tester to make sure Google can read your mobile site.

You might already have some of those covered, but it’s important to be sure your site is ready for mobile-first.

Speed is critical to success

Whether you’re running a desktop site or a mobile one, speed is critical.

If I have to wait for a site to load, I’m going to leave it.

Like I said before, load time is a major reason that people abandon pages and sites. With every second it takes for your page to load, more people are giving up on it.

If your website loads too slowly, readers will just click back to the search engine and try the next relevant link.

This is called “pogo-sticking.” And Google hates pogo-sticking.

If Google sees that people are leaving your page within the first five seconds of landing on it, they’re going to drop you down in the search results.

It won’t matter how great everything else is if you don’t have enough speed built into your sites.

Have you been focusing your SEO efforts on bounce rates, customer engagement, or time on site?

If so, you should be focusing on site speed because it will impact all of those metrics, too.

How can you know if your speed isn’t up to par?

There are a number of online sites that can test this for you.

A quick online test from WebPagetest or Google’s PageSpeed tools can give you a general idea of how your site is measuring up.

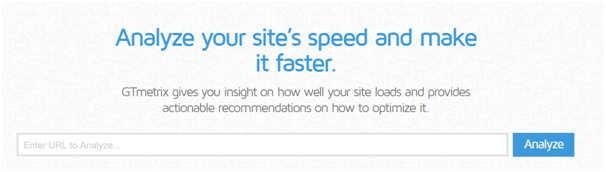
A more advanced tool I like is GTmetrix. It will help identify exactly what is slowing down your site.

analyze your sites speed

Make sure you test multiple pages. One page might load blazing fast, but you could be missing four that are slow as molasses.

Aim to test at least ten pages. Choose the pages that you know are the largest and have the most images.

Here are some common reasons a site has speed issues:

  • The images are too big and poorly optimized.
  • There is no content compression.
  • The pages have too many CSS image requests.
  • Your website is not caching information.
  • You’ve used too many plugins.
  • Your site is not using a CDN for static files.
  • Your website is running on a slow web host.

You might not be able to get a perfect score on Google’s PageSpeed Insights the first time, but you can certainly improve it.

Site errors will tank your rankings

Site errors are frustrating.

It doesn’t matter if we’re talking about customers or search bots. No one likes site errors.

Site errors are most often a result of broken links, incorrect redirects, and missing pages.

Here are a few things you need to keep in mind in regard to site errors.

You need to deal with 404 errors.

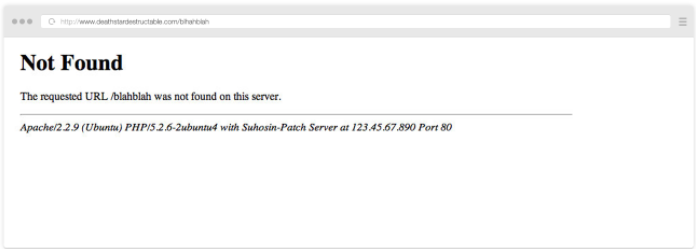
When’s the last time you clicked a link on your search engine results and ended up seeing an ugly 404 error page?

not found 404 page

You probably clicked “back” immediately and moved on to the next link.

404 error pages will increase customer frustration and “pogo-sticking.”

As I mentioned above, Google hates this.

You don’t want to have 404 errors on your website. But here’s the reality:

Every website is going to have 404 errors at some point. Make sure you know how to fix them.

For the occasions when you miss 404 errors, make sure that you at least customize your error pages.

Make sure you’re using 301 redirects properly.

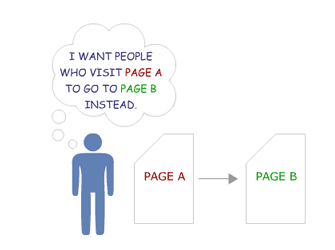
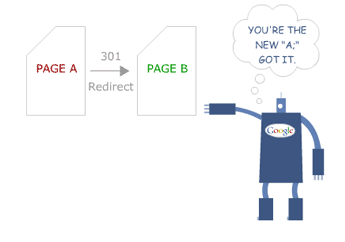
A 301 redirect is a permanent redirect to a new page.

301 redirect

A 302 redirect is a temporary redirect.

302 redirect

Using a 302 instead of a 301 can affect your readers and your search result rankings.

If you use a 301 redirect, search engines give the new page the same “trust” and authority that the old page had.

This means that if your old page was at the top of search engine rankings, your new page should take over that ranking. Of course, this is assuming that everything else is the same.

If you only use a 302 redirect, the bots see it as temporary.

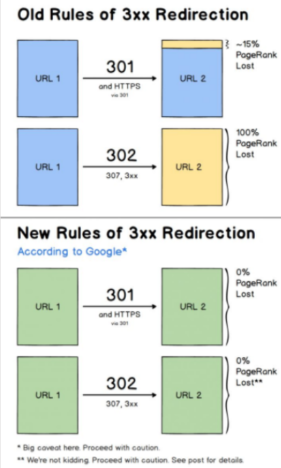
Before 2016, this meant Google did not give the new page any of the old authority.

Currently, Google says that any 30X redirect will keep the same page ranking.

old and new rules of 3xx redirection

Despite the reassurance from Google, there is still some doubt about whether this is true or not.

The fine print in the image above says, “proceed with caution.”

The risk is that leaving a 302 redirect active for too long will make you lose traffic.

It won’t matter how outstanding your other SEO tactics are.

It’s not worth the risk.

Even using 301 redirects can negatively impact your search engine rankings.

This is because they can slow down your site speed. They can also signal that there is a problem with the structure of your website.

Google sees this as an issue. They don’t want to send traffic to sites they believe will be hard to navigate.

Anything that hints that your website is not user-friendly is going to harm your search engine rankings.

Find and fix your broken links.

You’re on a web page, you’re reading an interesting article, and it has a link to something you want to know more about.

You click the link, and nothing happens.

You’re probably slightly annoyed, right?

What happens if you experience this a few times on the same website?

I’m going to guess that you’re not going to be happy. I know I wouldn’t be.

It’s easy to end up with a broken link. You could have external links to pages that the webmaster has moved or shut down.

It can happen to anyone.

So how do you find them fast and fix them before they impact your customers and your rankings?

Don’t worry. It’s not as complicated or time-consuming as you might fear.

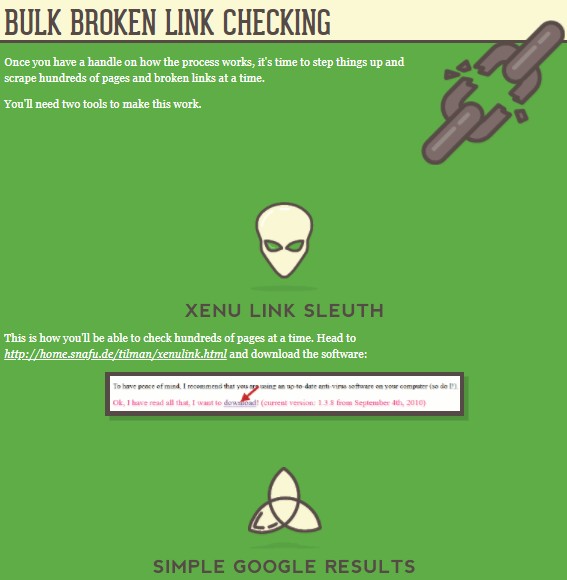
You just need to use the two tools and follow the four steps from this article.

bulk broken link checking

Watch out for duplicate site content.

There are two major problems with duplicate content.

One is having content that is the duplicate of someone else’s.

This problem should be obvious. Someone has plagiarized.

Google is constantly trying to improve their ability to detect duplicate content, and they’re getting pretty good at it.

Unfortunately, the bots aren’t high-tech enough to know which of you ripped off the other, so Google will penalize both of you.

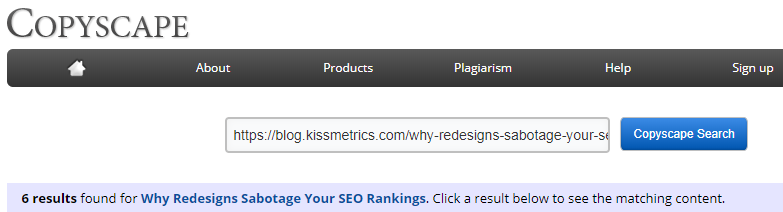
To help you avoid penalties, you can use Copyscape to make sure the content on your webpage is not too close to any other web pages.

copyscape

The second problem is that if you have too much duplicate or repetitive content on your own website, it can be really annoying for your regular, dedicated fans.

No one wants to read five different blogs that all basically say the same thing.

If your readers find that your articles are too similar, they will just stop following you.

After all, they’ll begin to believe you don’t actually have anything new to say.

Duplicate content within your site may not just be from a lack of ideas.

It can also be a result of page refreshes or updates (if your update is on a “new” page with a new URL).

So, how can you find out if you have duplicate content?

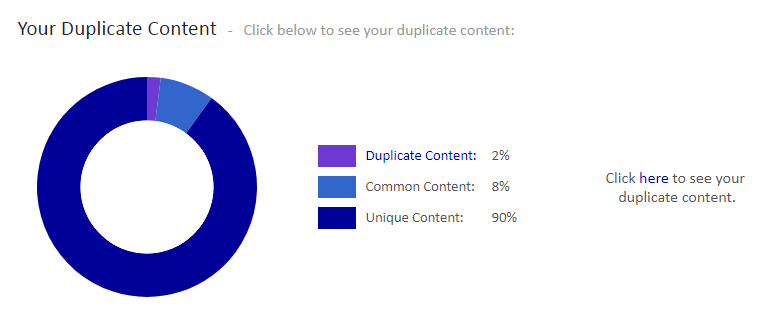
Siteliner can help you find any duplicate content on your own website.

your duplicate content copyscape

If you find duplicate content on your site, the easiest solution is to delete it.

But remember: You can’t just hit the delete button if the page is already indexed.

Remember the discussion above about site errors!

If you are about to delete an indexed web page, be sure to use a permanent 301 redirect.

What if you don’t want to delete a page? After all, we know too many redirects can be bad as well.

The next best option is to add a canonical URL to each page that has duplicate content.

canonical URL

This will tell search engines that you know that your site has indexed pages that are duplicate content, but that there is one version that you want the search engine to direct visitors to.

Know about other website errors.

Like I mentioned above, poor website structure will hurt your rankings.

Make sure you’ve built your website with properly-structured data.

This means using categories and web page groupings that make sense.

Solid structure helps improve the searchability of your site.

For example, what if I want to know if you’ve written an article on technical SEO?

I’m not about to scroll through hundreds of blog posts looking for one on that topic. Instead, I will go to the search box and type in my keywords like I would on a search engine.

If you structure your website properly, it will show me any articles related to that subject. Not only that, but it will pull them up quickly.

It’s a lot easier for your site to find relevant articles if it only has to search through a category rather than your entire website.

Remember that speed is one of the top issues for sites. Structured data allows users and bots to find related articles faster.

Building your structured data (which some refer to as schema markup) isn’t all that technical.

Schema.org exists for the sole purpose of helping improve the schema markup of websites.

welcome to schema

How does schema impact your search results?

It helps describe your content to search engines.

That means that it helps Google understand what your website is really all about.

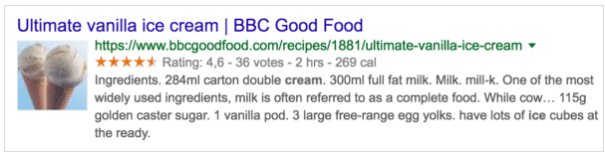
It also helps Google create rich snippets.

Here’s a normal Google snippet:

normal google snippet

Now, check out a Google rich text snippet.

google rich text snippet

You can probably guess which one has a better click-through rate.

This isn’t about content or on-page SEO. This is all technical SEO.

Some other technical site errors you need to watch out for are:

  • Page sizes that are too large
  • Having issues with using meta refresh
  • Hidden text occurring on your pages
  • Unending data, such as calendars that go out for 100 years

Never ignore crawl errors

Search engines send bots to crawl your site all the time.

A crawl error means the bots found something wrong that will impact your search engine ranking.

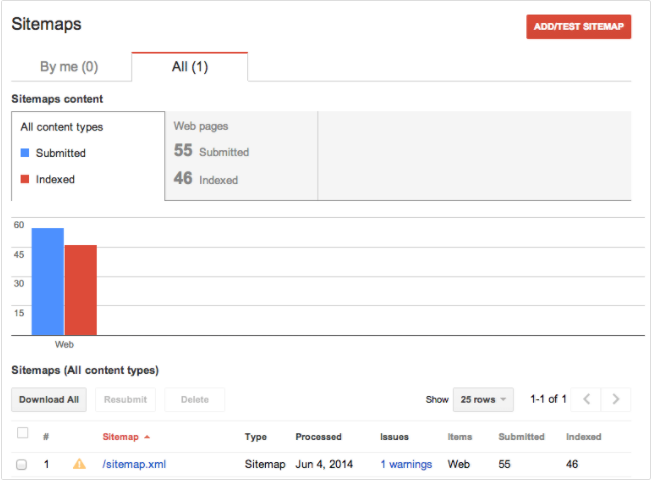
First, make sure that you have a working sitemap and that your web pages are all indexed.

sitemaps website console

If Google can’t read a sitemap, then it can’t even try to crawl your site.

It won’t know your site even exists.

Avoid being the lost, forgotten soul by making sure you have an XML sitemap on your website.

Of course, step two is providing that sitemap to the search engines.

Once you’ve done this, the search engine should be able to index your pages.

This basically means filing them for review so they can measure them against all other similar pages and decide how to rank them.

If you get a no index error, it means that Google didn’t register your pages.

If they’re not registered, they will not appear on the search engine results page.

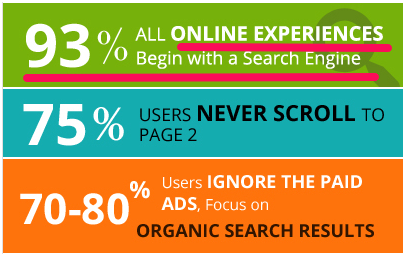
Even with the best content in the world, your traffic will be nonexistent if you don’t show up on search results pages. If you don’t believe me, look at these statistics:

all online experiences begin with a search engine

One common reason that pages don’t index properly is URL issues.

Make sure that your URLs aren’t too long or messy.

Avoid having any URLs that have query parameters at the end of them.

Other indexing problems could be title tag issues, missing alt tags, and meta descriptions that are either missing or too long.

Beyond indexing issues, there are other kinds of crawl errors.

In many cases, the error is due to one of the site content errors that I talked about in the last section.

Other types of crawl errors are:

  • DNS errors
  • Server errors (which could be a speed issue)
  • Robots failure
  • Denied site access
  • Not followed (which means that Google is unable to follow a given URL)

Image issues can cause you a lot of problems

Visual content is a vital part of content marketing and on-page SEO.

The problem is that this on-page SEO strategy can often lead to technical SEO issues.

Images that are too large can tank your speed and make your site less mobile-friendly. Broken images can also hurt the user experience, increasing page abandonment.

You know you need lots of high-quality images. But now I’ve just told you that the very thing supposed to help your rankings can hurt them.

What do you do?

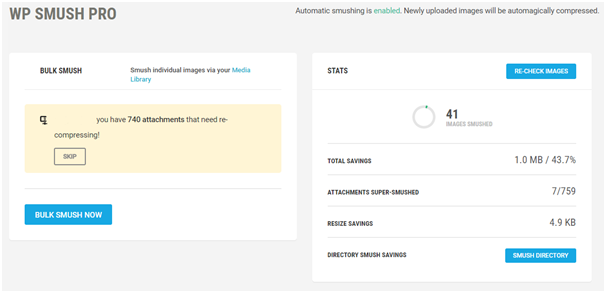
It’s easy. Just smush your images with Smush Image Compression and Optimization.

wp smush pro

This plugin will shrink your images down so that their size doesn’t slow down your site.

The best part is that it can do this without impacting the image quality. You get the faster load, without sacrificing beauty.

You can also use WP Super Cache for creating a static image of your website. It’s a similar WordPress plugin to Smush Image Compression and Optimization.

Super Cache can lessen the amount of data your site uses and speed up your load time.

What about broken images?

Searching for broken images is the same as searching for broken links. You want to use a tool that can search your site for any broken images.

Most tools that check for broken links can also check for broken images.

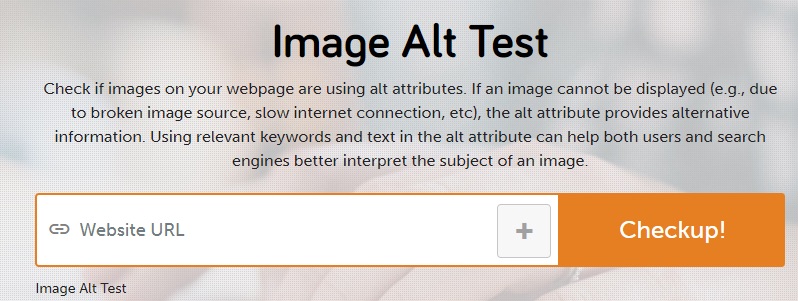
Are your images using alt attributes? Since you might not always catch broken images right away, this can be helpful.

You can use a website like SEO SiteCheckup to see if you’ve set up alt attributes on your site.

image alt test

If your image ends up broken, the alt text provides alternative information.

Security matters more now than ever before

Google has been cracking down on security.

You used to be able to assume that http:// would be at the start of every website address.

But that’s no longer the case.

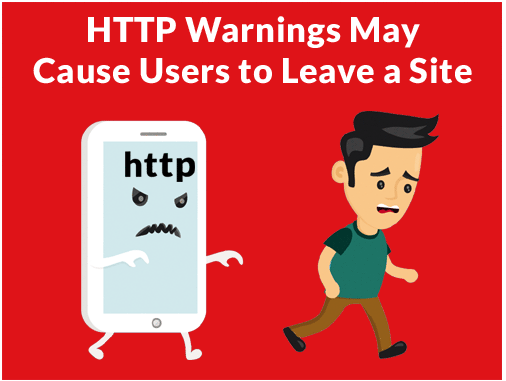
Google has warned that as of July 2018, Chrome will begin to warn users if a site is insecure.

http warnings may cause users to leave a site

No matter how excellent your content is, customers are less likely to click through to a website when a browser warns them that it might be unsafe.

If your address is still using http, you could begin losing traffic fast (if you aren’t already).

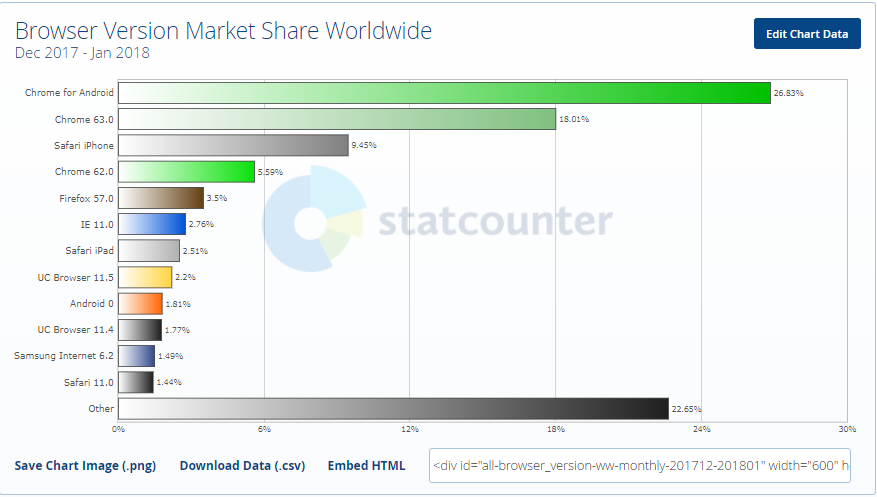
Chrome is the browser with the largest market share in the world.

browser market share worldwide

Google has already made it pretty clear that they prefer https sites.

Just take a look at how Chrome already highlights the security of https sites:

There are different types of SSL, so you’ll want to be sure you do your research to pick the right one for your site.

Conclusion

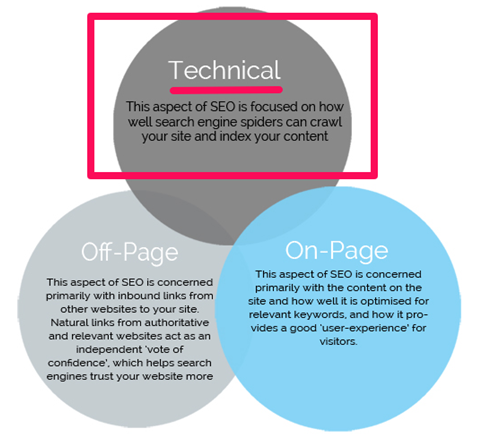
There are three different aspects of SEO, and technical SEO is the most important of the three.

three types of seo

SEO guidelines are constantly changing.

Every time a major search engine significantly updates their algorithm, SEO has to adapt.

But the good news is that the frequency of changes for Technical SEO is lower than the others.

After all, it’s not like search engines or readers will suddenly decide they’re okay with slower speeds.

If anything, you will see the average acceptable speed continue to drop. Your site simply has to be faster if you want to keep up with SEO demands.

Your website has to be mobile-friendly. This is only going to become more important over time, too.

It has to work without errors, duplicate content, and poor images.

Search engines also have to be able to crawl it successfully.

These things are all critical.

They are crucial to your success on search engines and with actual readers and customers. If you want to prioritize your SEO efforts, make sure you tackle the technical aspects first.

As I’ve mentioned several times, it won’t matter how amazing your on-page SEO is if you fail at technical SEO.

It also won’t matter how great you are at off-page SEO if you’re horrible at the technical stuff.

Don’t get overwhelmed by the idea of it being “technical” or complex.

Start with the big, critical aspects discussed above and tackle them one problem at a time.

How have you found success with technical SEO on your site?

About the Author: Neil Patel is the cofounder of Neil Patel Digital.

FaceBook